Outdoor griddles tend to come with three familiar headaches: rust, uneven temperatures, and a maintenance routine that can feel longer than the cook itself. Stainless steel promises to take a lot of that work off your plate, but some stainless griddles quickly climb past $2,000.
That makes the Solo Stove Steelfire 22, starting at $399 at the time of testing, a pretty interesting proposition. Can it eliminate the seasoning routine without giving up the crust, heat, and cooking capacity that make a griddle worth owning?
I put it through six practical tests, then added a steak test because, frankly, a griddle has to cook a good steak if it wants a spot in my camping setup.
Disclosure: Solo Stove supplied this griddle at no cost ahead of its public release. I had several weeks to test it, chose the tests myself, and formed my own conclusions. Conditions ranged from roughly 30 to 40°F on colder days to the mid-70s, with cooks around the yard, at camping locations, and down at the beach.
Key Takeaways
- The Steelfire 22 approached 500°F after a seven-minute preheat in my repeated test.
- The bread test revealed a hotter center and gentler edges useful for staged cooking.
- Smash burgers and steaks developed substantial crust without a seasoned cooking surface.
- The $399 griddle handled family breakfast while removing seasoning from the maintenance routine.
Table of Contents
- Why Stainless Steel Interested Me in the First Place
- Test 1: Does the Steelfire Heat Up in Seven Minutes?
- Test 2: How Evenly Does It Cook?
- Test 3: Can It Handle Wind?
- Test 4: Stainless Steel Smash Burgers
- Tests 5 and 6: Eggs and a Full Family Breakfast
- Bonus Test: Can 17,000 BTU Deliver a Steakhouse Crust?
- Cleanup: Less Maintenance, Not No Cleaning
- My Verdict: Is the Solo Stove Steelfire 22 Worth $399?
Why Stainless Steel Interested Me in the First Place
For most people, carbon steel’s ability to cook isn’t the problem. It is keeping rust away, maintaining seasoning, and dealing with cleanup afterward.
I have run into that with large carbon steel griddle accessories for kamados. Once the seasoning needs attention, you discover that the cooking surface is too large to fit in a household oven. What should have been a handy accessory becomes another maintenance project.
There is also a value question. The carbon steel accessory I had for my Big Joe cost about $250 on its own. Here, $399 gets you a complete working griddle.
But easier ownership only matters if the food is good. I wanted to answer six questions:
- Preheat speed: How quickly can I start cooking?
- Heat distribution: Does food cook consistently across the surface?
- Wind resistance: Will the burner stay lit when outdoor conditions get difficult?
- Smash burger crust: Can stainless steel deliver a proper sear?
- Egg release: Can I cook and lift eggs successfully?
- Breakfast capacity: Is there enough usable space to feed my family of four?
The surface looked promising before I cooked anything. Out of curiosity, I placed the cooking plate inside my 24-inch kamado and couldn’t close the lid. That is not a recommendation to use it as a kamado accessory, but it gave me a useful sense of how much cooking space this portable griddle offers.
Test 1: Does the Steelfire Heat Up in Seven Minutes?
A fast preheat matters at home, but it matters even more on campsite checkout morning. If the trailer needs to be packed and on the road before 11 a.m., breakfast cannot begin with an endless wait for the griddle.
Solo Stove claims the Steelfire can be ready to sear in as little as seven minutes. I timed the preheat, but my first attempt came with an important measurement lesson: shiny stainless steel can fool infrared thermometers.
The reflective surface makes readings from an infrared temperature gun or thermal camera difficult to interpret accurately. I initially used both, then repeated the test using an instant-read thermometer with a thermocouple suitable for the temperatures involved.
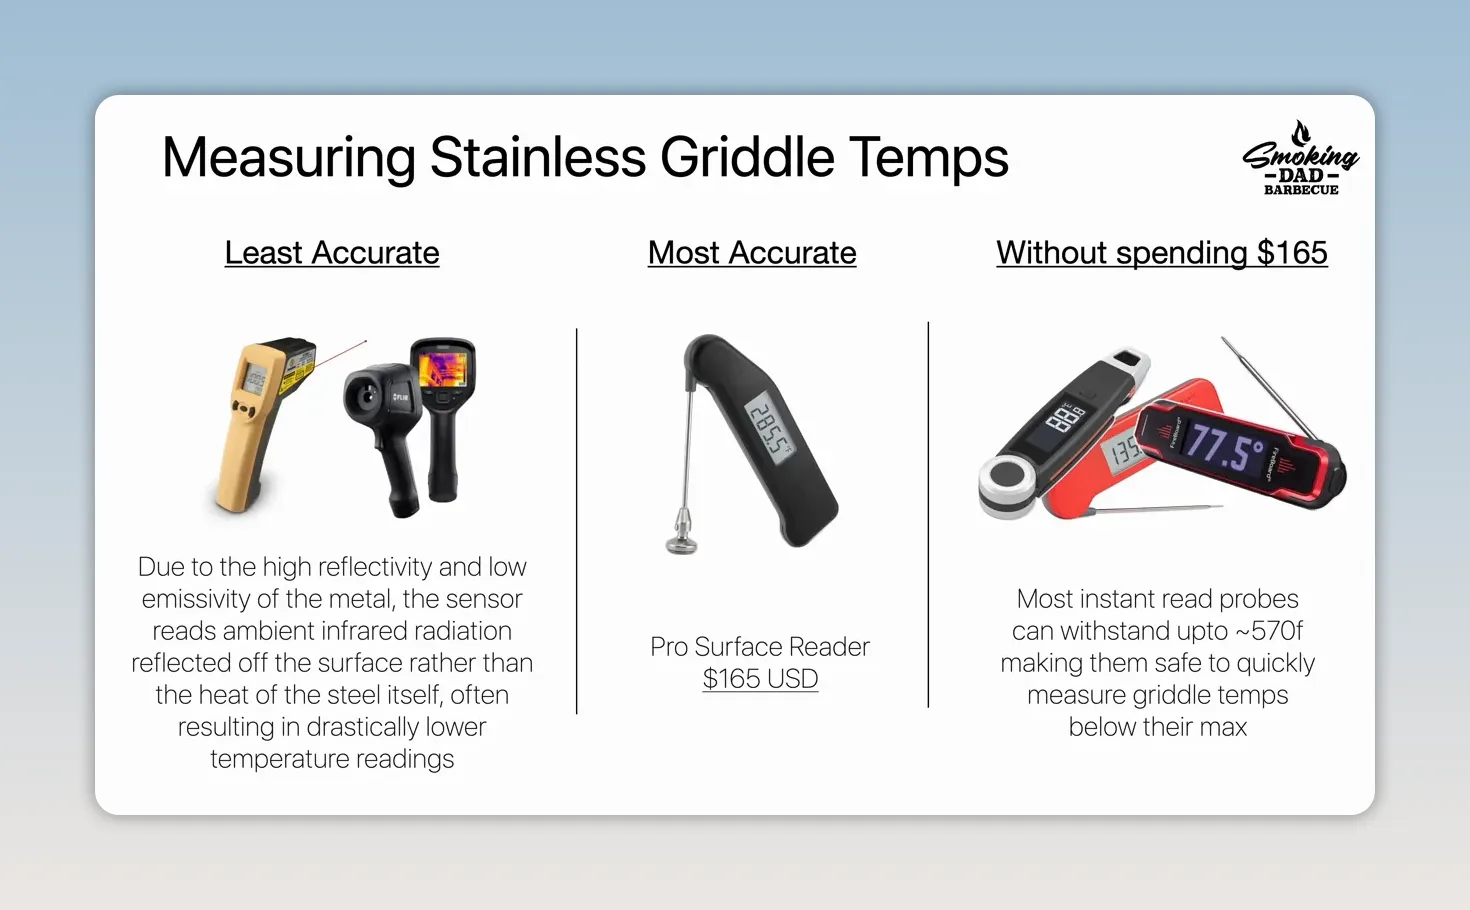
With the repeated seven-minute preheat, I measured temperatures approaching 500°F. This thing gets hot quickly.
The practical takeaway is not that every thermometer can safely measure a hot griddle. Check the temperature limits and intended use of your own equipment. My takeaway from this test was that the Steelfire’s quick-start claim held up in my testing once I corrected the measurement method.
Test 2: How Evenly Does It Cook?
A griddle can get plenty hot and still be frustrating if one area burns food while another barely cooks it.
I used thermal imaging and contact spot checks, but I did not want to base the whole conclusion on instruments that had already shown limitations on reflective stainless steel. So I added the old-fashioned test: a loaf of bread.
I covered the surface with bread, turned on the griddle, let it cook for about 10 minutes, and flipped the slices to compare browning.
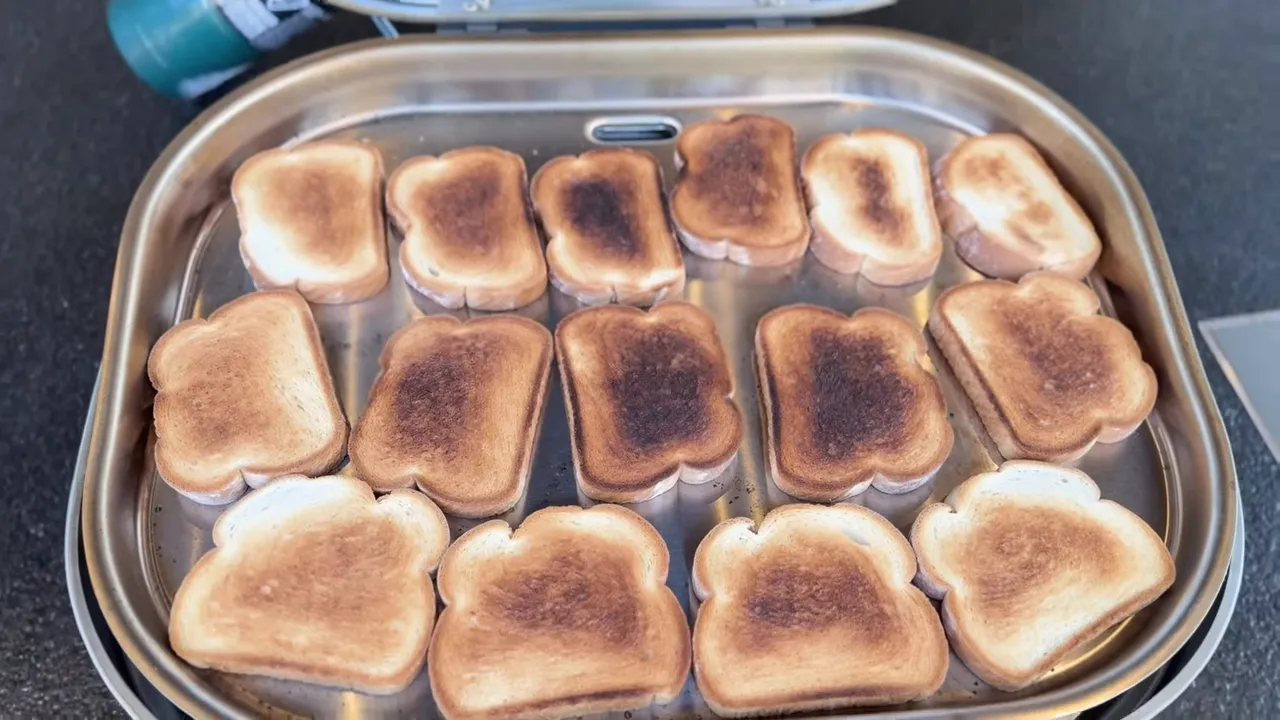
The result made sense given the racetrack burner underneath. Heat reached broadly across the surface, but the middle browned more aggressively than the outer edges.
My temperature spot checks suggested good consistency across much of the cooking area, while the bread made the center-to-edge difference easy to see. I would not describe the entire plate as identical in temperature. I would describe it as a broadly usable surface with a hotter central cooking area.
That is something I can work with:
- Use the middle to develop crust on potatoes, bacon, sausages, burgers, or steak.
- Move food toward the sides once it has the color you want.
- Use the gentler perimeter to hold food while the next part of the meal cooks.
For real cooking, that pattern worked well. It gave me useful space rather than a tiny hot spot surrounded by areas I could not use.
Test 3: Can It Handle Wind?
Cooking outdoors has a natural enemy: wind.
At a campsite or a Buffalo Bills tailgate, wind can turn an otherwise straightforward cook into a battle with the burner. I wanted to see whether the Steelfire would stay lit under a more aggressive blast of moving air.
In the name of backyard science, I brought out a leaf blower.
I preheated the griddle, closed the lid, and directed air around the unit. Afterward, using high-heat gloves, I lifted the cooking plate to check the burner.
The flames were still burning.
That was an encouraging result for the way I intend to use this griddle. It was a practical burner-survival test, not a calibrated wind-speed test or a measurement of exactly how much surface temperature changed. Still, the burner stayed lit through the challenge I threw at it.
Test 4: Stainless Steel Smash Burgers
This was the big one. If stainless steel could not maintain enough cooking heat to produce a proper smash burger crust, it would show up here.
I deliberately skipped surface seasoning and added no oil or other release aid before putting the beef down. This was bare stainless steel meeting smash burgers.
The burgers released successfully with the spatula, but that alone was not especially surprising. Smash burgers have plenty of fat to help them along.
What impressed me was the crust.
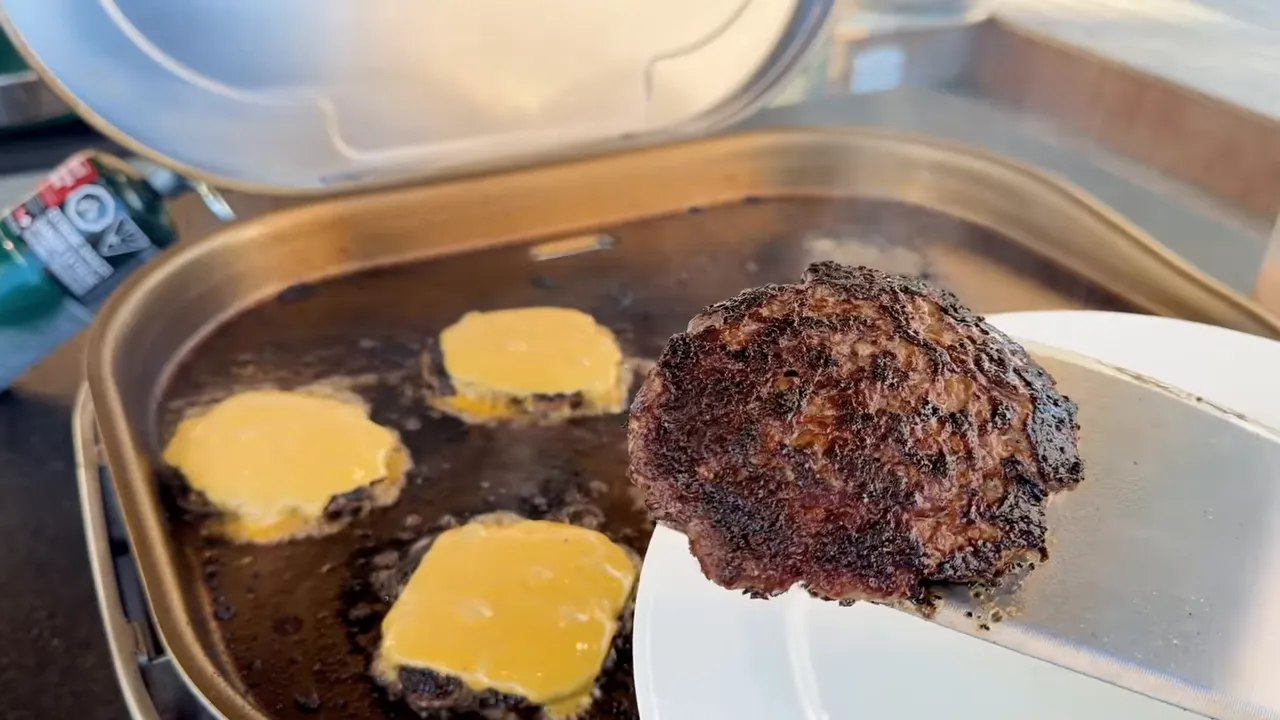
The Steelfire produced the deep browning I look for in a smash burger, with no pre-seasoned surface needed. It did better than I expected, particularly given that I had not helped the surface along before cooking.
That does not make stainless steel universally nonstick. It does show that, in this cook, the combination of heat and the beef’s own fat delivered both successful release and a serious sear.
Tests 5 and 6: Eggs and a Full Family Breakfast
A few burgers are one thing. A full breakfast is a better test of whether a portable griddle actually fits family life.
I combined the egg-release test with a breakfast cook featuring potatoes, bacon, sausages, pancakes, and eggs. The goal was not to squeeze every ingredient onto the plate simultaneously. It was to cook the whole meal in a sensible sequence while using the available space.
The Cooking Order That Worked
- Start with potatoes. I tossed them with a little oil and salt, cooked them until they developed good color, then moved them to one side.
- Add bacon and sausages. These used the central cooking space while the potatoes stayed out of the way.
- Remove the finished bacon. That freed space while the sausages continued cooking.
- Check the sausages with an instant-read thermometer. For this particular cook, I took them into roughly the 175 to 180°F range.
- Use the open center for pancakes and eggs in stages. The perimeter continued earning its keep as a holding area.

The rounded shape did not prevent me from arranging a useful amount of food. Potatoes fit along one side, sausages followed the perimeter, and the middle remained available for pancakes.
That is the kind of capacity I care about when camping with a family of four: not just the size of the surface, but how effectively I can keep the meal moving.
Did the Eggs Stick?
I was able to cook, lift, and turn the eggs with the spatula, then serve them with the potatoes. Between scraping, clearing space, and continuing with the next batch, the griddle handled the breakfast without bringing the cook to a halt.
This was a practical cooking test on a surface that had already been used for breakfast foods, not a separate dry-egg test on pristine stainless steel. Within that real meal, the eggs worked successfully.
For food safety, use a thermometer and the appropriate guidance for the specific meat you are cooking. My preferred sausage finishing temperature is not a universal minimum for every sausage; the safe minimum internal temperature chart is a useful reference.
Bonus Test: Can 17,000 BTU Deliver a Steakhouse Crust?
I love steak. If this griddle wants to earn its place in the RV, steak is a mandatory item in my books.
I tried a slightly unconventional approach using Solo Stove’s smash burger warming accessory as part of a two-stage cook.
- I seasoned two New York strip steaks and placed them on the accessory’s raised rack under its cover.
- I let them cook until the internal temperature was just over 130°F.
- I increased the griddle heat, added my sear sauce, and moved the steaks directly onto the hot cooking surface.
The question was whether the Steelfire’s 17,000 BTU burner could develop a substantial crust without taking the inside past the doneness I wanted.
Boy, oh boy, did it deliver.
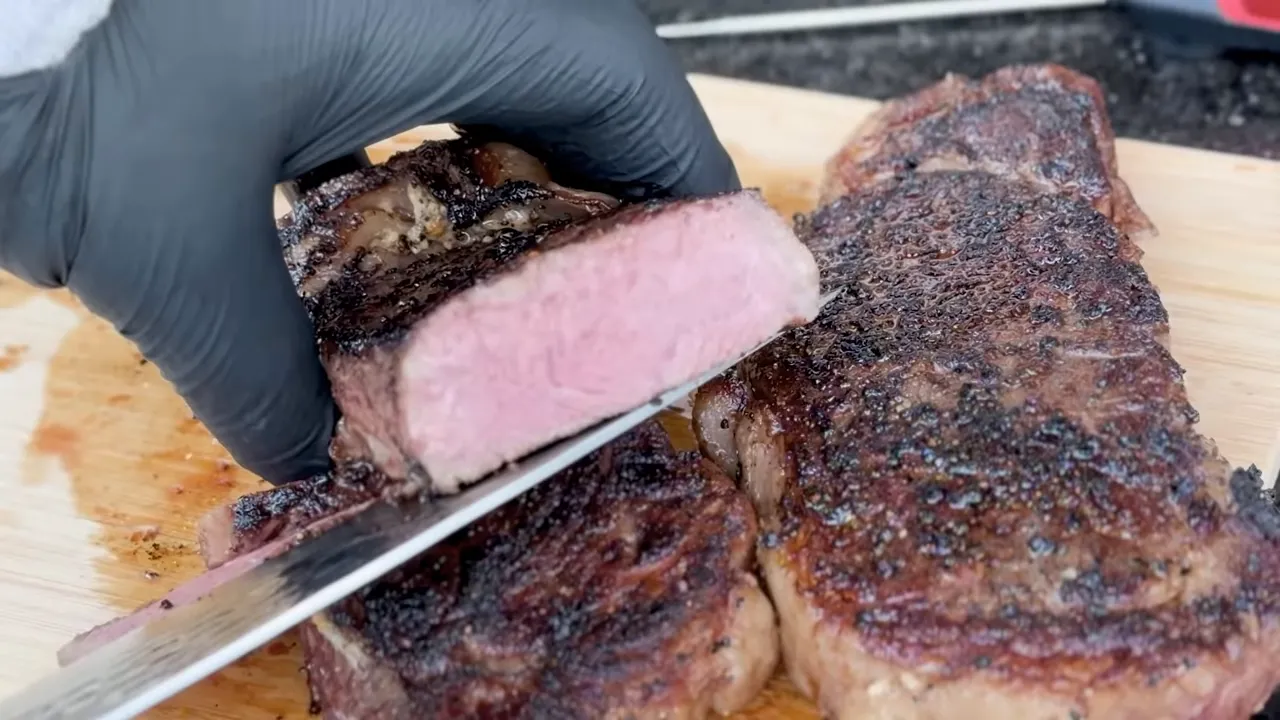
The steaks came off with an excellent-looking sear and consistent doneness through the interior. The 130°F reading describes the point I chose before searing in this test, not a food-safety recommendation.
Between the steaks and smash burgers, I did not find a practical searing limitation in the cooks I tested. Stainless steel was absolutely capable of producing the crust I wanted.
Cleanup: Less Maintenance, Not No Cleaning
The biggest ownership benefit here is removing seasoning from the routine. I did not have to build a seasoning layer before cooking or restore one afterward.
There was still grease and cooked-on food to deal with. Stainless steel does not make that disappear.
The cleaning instructions shown during the burger cook laid out a straightforward process:
- Scrape grease and debris into the drip tray while the surface is warm or on low heat, using water to loosen residue.
- Once the surface has cooled, wipe it clean with a soft cloth and mild soap.
- When needed, restore the stainless steel’s shine with a food-safe stainless steel cleaner.
During the breakfast test, being able to scrape, clear the surface, and keep cooking was particularly useful. That is a more meaningful benefit to me than simply having a shiny plate before the first cook.
I would keep the conclusion in proportion, though. These were several weeks of cooking tests, not a long-term outdoor corrosion study. The clear result was easier day-to-day use without the seasoning work that had frustrated me with carbon steel.
My Verdict: Is the Solo Stove Steelfire 22 Worth $399?
Is it perfect? No. I have yet to test a grill, griddle, or smoker that clears that bar.
But judged against the problems I wanted it to solve, the Steelfire 22 did very well.
- Fast startup: My repeated test reached temperatures approaching 500°F in about seven minutes.
- Usable heat distribution: The hotter center and gentler edges worked well for searing and staged meal preparation.
- Outdoor performance: The burner stayed lit through my wind challenge, and the griddle performed across the weather conditions I tested.
- Proper searing: Both smash burgers and steaks developed excellent crust.
- Family practicality: I could work through a complete breakfast for four without running out of useful cooking space.
- Simpler ownership: It removed seasoning from the maintenance routine.
The construction also impressed me. The stainless steel felt thicker than on any Solo Stove product I had previously tested, and the cooking performance backed up that substantial feel. I understand why Solo Stove describes it as commercial grade, although my evaluation was based on home and outdoor cooking rather than commercial kitchen use.
The 30-inch Steelfire had already attracted praise, but a smaller, more affordable, more portable version fills a different need. I found this 22-inch model easy to move between locations, and it gave me enough cooking capacity without requiring a full-size backyard installation.
At the $399 starting price I tested, I give the Steelfire 22 two thumbs up. Not because stainless steel automatically cooks better than carbon steel, but because this griddle delivered the cooking results I wanted while taking a frustrating maintenance job out of the equation.
That is a pretty good reason not to be afraid to fire it up, even on a brand-new griddle.


