Yes, the Lone Star Grillz Adjustable Charcoal Grill can work as a vertical smoker. But the more interesting question is how well it handles thick pork steaks cooked directly over a bed of real post oak coals. That is where this cook got fun.
I started with a dry-aged pork shoulder, cut it into roughly 2-inch steaks, and borrowed heavily from Ms. Tootsie’s Hill Country approach at Snow’s BBQ: direct heat, a simple seasoning, a mop sauce, and a plan to turn the steaks only once.
The result? Beautifully rendered fat, plenty of juice, and that unmistakable flavor of cooking directly over coals. There was also a useful lesson in fire management. This setup works, but keeping a wood-coal bed going is not the same thing as loading a charcoal basket and walking away.
Key Takeaways
- The LSG’s upper rack and lowered fire grate provide approximately 22½ inches of direct-coal cooking clearance.
- Thick pork shoulder steaks finished around 185°F with regular mopping delivered juicy meat and beautifully rendered fat.
- Maintaining a real wood-coal bed required active attention because fresh splits introduced additional flame.
- Holding temperature, not elapsed time alone, determines how long an insulated rest can safely continue.
Table of Contents
- Why the LSG Is More Than a Charcoal Grill
- Preparing the Dry-Aged Pork Steaks
- Setting Up the LSG for Vertical Smoking
- Ms. Tootsie-Inspired Mop Sauce for Three Pork Steaks
- Cooking and Mopping the Pork Steaks
- The Biggest Challenge: Keeping Real Wood Coals Going
- Resting with Ghee, and a Holding Lesson
- The Results: Direct-Coal Flavor in Spades
- A Note on Temperature Gear
Why the LSG Is More Than a Charcoal Grill
The 48-inch Lone Star Grillz Adjustable Charcoal Grill is difficult to squeeze into one category. I had already used it for direct grilling and offset-style smoking, with excellent results on chicken halves, brisket, ribs, and sausage.
Its versatility comes down to three useful configurations:
- Direct grilling: Raise or lower the adjustable charcoal grate to change the distance between the fire and the food, whether you are searing a steak or cooking chicken thighs.
- Offset-style smoking: Use its two independent fireboxes to separate the food from the active fire.
- Vertical cooking: Put the food on the upper rack directly above a low coal bed.
For this test, I wanted that third configuration. Not indirect smoking with a barrier between the pork and the fire, but Hill Country-style cooking with the meat elevated above exposed coals.
That distinction matters. The goal was to take advantage of the grill’s height while keeping the flavor of direct-heat barbecue.
Preparing the Dry-Aged Pork Steaks
Dry-aging had worked beautifully in an earlier beef steak experiment, so I wanted to explore the same idea with pork shoulder. My hope was that the aging process would bring enough flavor that I could keep the seasoning simple and skip an overnight dry brine.
This was not a dry-aging tutorial, and I did not run a fresh-versus-aged comparison alongside this cook. It was a test of the finished dry-aged pork on the LSG, not proof of exactly how much difference aging made.
Cutting the shoulder into thick steaks
With a fresh pork shoulder, I can normally cut about three steaks before reaching the bone. This shoulder had shrunk during aging, so the bone became an obstacle after just one steak.
I marked out roughly 2-inch portions and finished separating the bone-in cuts. My improvised solution involved a power tool, which satisfied my inner Tim the Toolman, but having a butcher cut thick bone-in pork steaks is the much more straightforward route.
I ended up with three full-size steaks and two smaller pieces. The smaller ones went aside for another day. The three big steaks were dinner.
Keep the seasoning simple
I seasoned the pork with just:
- Freshly cracked black pepper
- Lawry’s seasoned salt
Then the steaks went into the refrigerator for about an hour to an hour and a half. That gave the seasoning time to adhere while the post oak burned down into cooking coals.
This was a short refrigerated seasoning rest, not an overnight dry brine. I wanted the pork, the aging, and the wood fire to do most of the talking.
Setting Up the LSG for Vertical Smoking
The first job of the day was lighting real post oak splits. By the time I was cutting and seasoning pork, the neighborhood already smelled pretty glorious.
Starting early was important because I did not want to put the steaks over a tall, active wood flame. I wanted a substantial bed of embers, with the initial splits burned down enough to avoid excessive direct heat.
Use the upper rack and lower the fire
Bradley from Chud’s BBQ has explained that his Chud Box was designed around roughly 16 to 18 inches of clearance between the cooking grate and the coal bed. Measuring the LSG, I found I could get approximately 22½ inches of separation with the charcoal grate in its low position and the food on the upper rack.
That gave me a promising starting point: the pork could sit directly above the coals without being positioned right on top of the fire.
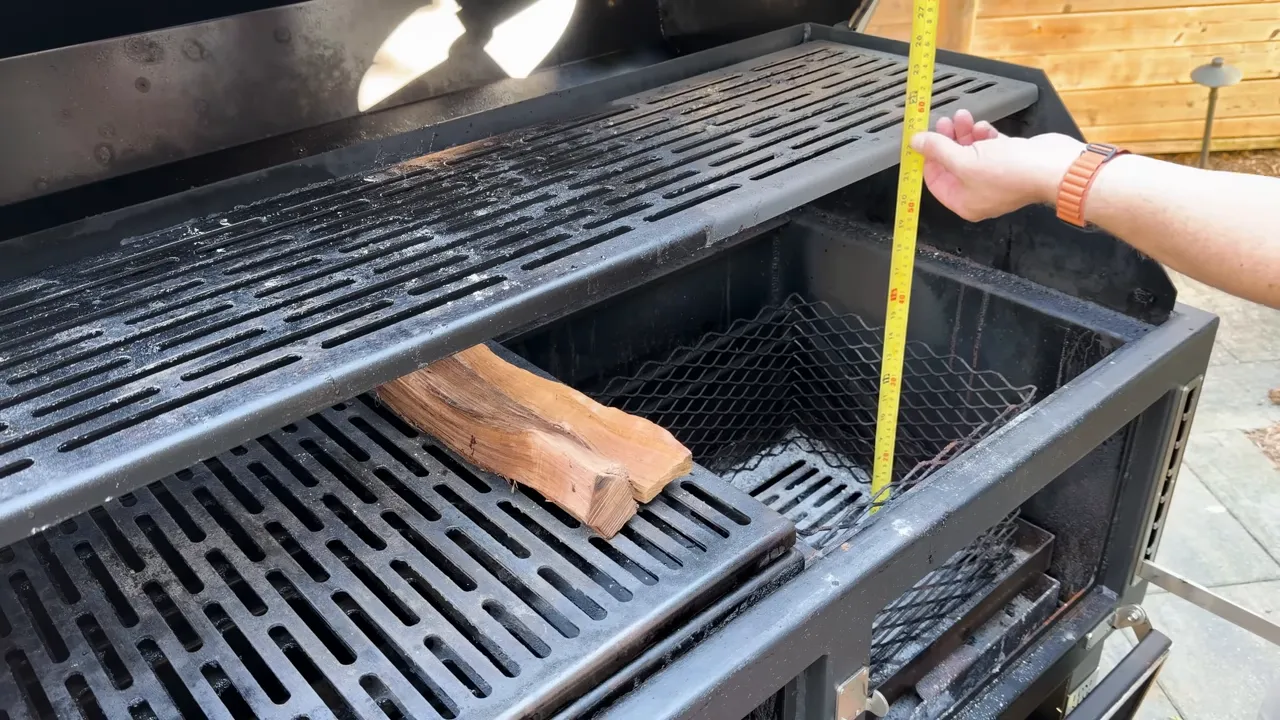
The basic setup was simple:
- Build a post oak fire in one firebox.
- Allow the splits to burn down into a useful coal bed.
- Keep the adjustable charcoal grate low.
- Place the pork steaks on the upper rack directly above the coals.
- Use wireless probes to track the cook and help identify when the fire needs attention.
I added more splits during the preparation period to build up the coal supply, then waited for the larger flames to settle before cooking.
Choose the texture you want
There are different schools of thought on pork steaks. Steve from Smoke Trails BBQ takes a more steak-like approach, while Cooper from Bar-A-BBQ smokes his to around 185°F using an M&M rotisserie in an offset-style configuration.
My personal favorite is the Hill Country approach: cook directly over coals and take the shoulder steaks higher so the fat renders beautifully. For this cook, my target was 185°F to 190°F internal, with the plan to turn them only once, following Ms. Tootsie’s approach.
Those are texture targets for this particular shoulder-steak method, not minimum food-safety temperatures. For general reference, the USDA safe-temperature chart specifies 145°F with a three-minute rest for whole pork steaks, chops, and roasts.
Ms. Tootsie-Inspired Mop Sauce for Three Pork Steaks
A mop sauce is a big part of this cook. I used Ms. Tootsie’s recipe as the foundation, scaled down from the much larger batch that starts with a gallon of water.
I also made two practical changes. First, I cooked the onion and dry mustard in the butter before adding the remaining liquids. Second, I substituted apple cider vinegar because I had run out of white vinegar.
Ingredients
- ¾ stick of butter
- 1 white onion, coarsely chopped
- 1 tablespoon dry mustard
- ¼ cup Worcestershire sauce
- ½ cup white vinegar, or apple cider vinegar as used here
- 6 cups water
Method
- Melt the butter in a pot over heat.
- Add the coarsely chopped onion and let it simmer in the butter.
- Stir in the dry mustard.
- Add the Worcestershire sauce and vinegar.
- Pour in the water, bring the mixture to a boil, and boil for about 10 minutes.
- Keep the mop warm during the cook.
This is a thin mop, not a thick finishing barbecue sauce. It is something to apply throughout the cook rather than a sticky coating added at the end.
Cooking and Mopping the Pork Steaks
I let the steaks cook undisturbed at the beginning, with the plan to start mopping after about an hour.
At the first mopping check, the probes were reading approximately 167°F and 173°F in two of the steaks. I had not flipped them yet, and the color was already looking fantastic.
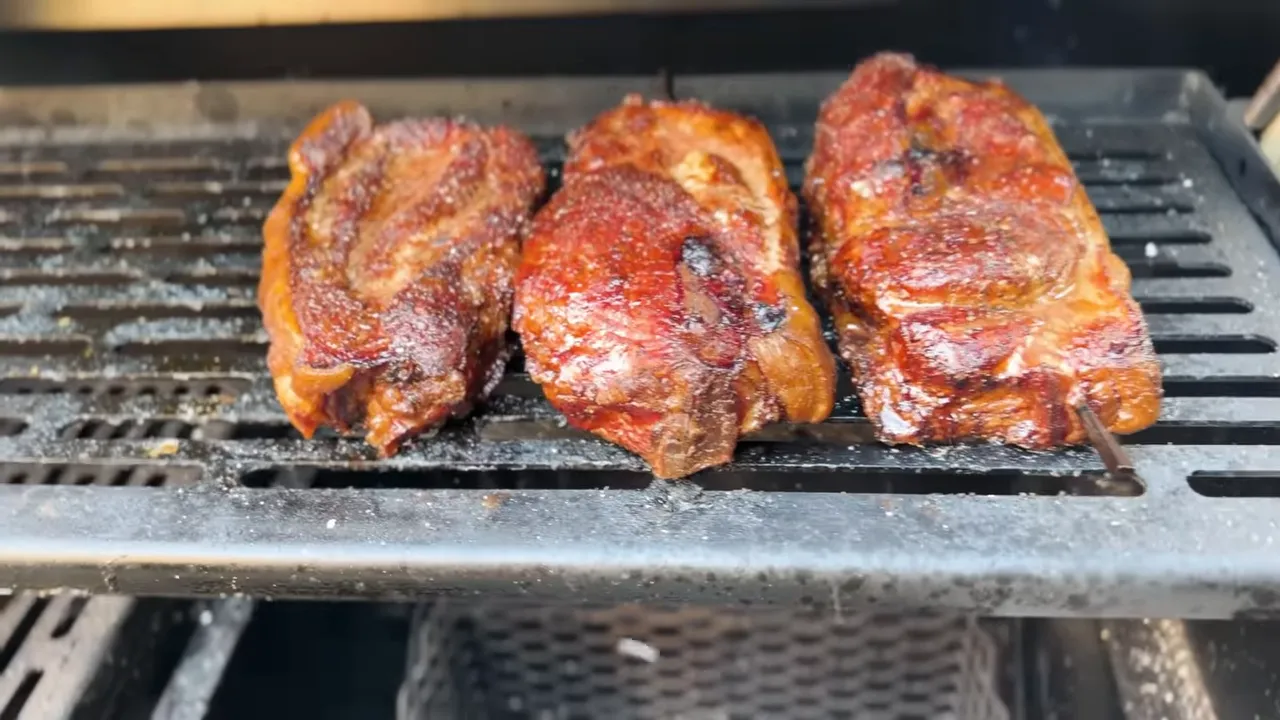
From there, I continued applying the warm mop approximately every 30 minutes. After mopping began, the steaks needed about another three hours to reach roughly 185°F.
That is an important timing detail. The three hours were additional cooking time after the first mop, not the entire cook from raw pork to finished steaks.
I used the wireless probes to follow progress and an instant-read thermometer to check the steaks before pulling them for a rest.
The Biggest Challenge: Keeping Real Wood Coals Going
The vertical configuration worked well. The part I want to improve is maintaining the coal bed throughout the entire cook.
The original post oak embers did not provide enough heat to carry the whole cooking period. To keep things moving, I fed small wood splits into the firebox.
That solved one problem while creating another: fresh wood produces flame before it becomes the next batch of cooking coals.
Because the pork sat directly above that firebox, I had to manage the flame height so it did not start punishing the underside of the steaks. This is familiar territory from live-fire cooking on smaller kamado-style grills. When the food and the replenishing fire share a limited space, there is only so much room to work.
Two possibilities I considered were:
- Using an external charcoal chimney to prepare more wood coals.
- Using the second firebox to burn wood down before replenishing the cooking side.
Those are ideas to explore, not solutions I proved during this cook. Switching to charcoal would simplify the fuel-management side, but my goal here was to maintain a real wood-coal fire without creating excessive flames beneath the food.
We avoided a disaster, and the finished pork did not suggest that the fire had got away from me. Still, this was an actively managed cook.
The charcoal basket’s advertised burn time of up to 12 hours is a separate question. This test did not validate that claim or establish overnight, hands-off performance. Starting with wood and transitioning to charcoal is another useful test, but it should not be confused with what happened here.
Resting with Ghee, and a Holding Lesson
For the rest, I borrowed a little inspiration from Cooper’s butter treatment, but used a modest amount of clarified butter, or ghee, instead of a heavy butter bath.
I like beef tallow when resting brisket. For pork, clarified butter is a lovely flavor pairing. I added some to the pork steaks, covered them in a pan, and placed them inside my Drip EZ holding blanket.
The original plan was a 90-minute rest before dinner. Dinner slipped, and the actual hold stretched just beyond two hours.
At that point, with the outdoor temperature around 68°F, I checked the pork and found readings around 138°F to 140°F. That was the limit for this setup, not a reason to assume the blanket could safely handle another hour.
Measure holding temperature rather than trusting a fixed number of hours. For home hot holding, keep food at 140°F or above, as explained in the USDA food-safety basics. For a longer hold, I would want a better-insulated arrangement or controlled hot holding, with temperature checks.
My initial confidence that I might get two to three hours out of the blanket was too optimistic for these conditions. The actual readings were the useful lesson.
The Results: Direct-Coal Flavor in Spades
Once sliced, the steaks had good smoke character, plenty of juice, and fat that had rendered soft rather than staying chewy.
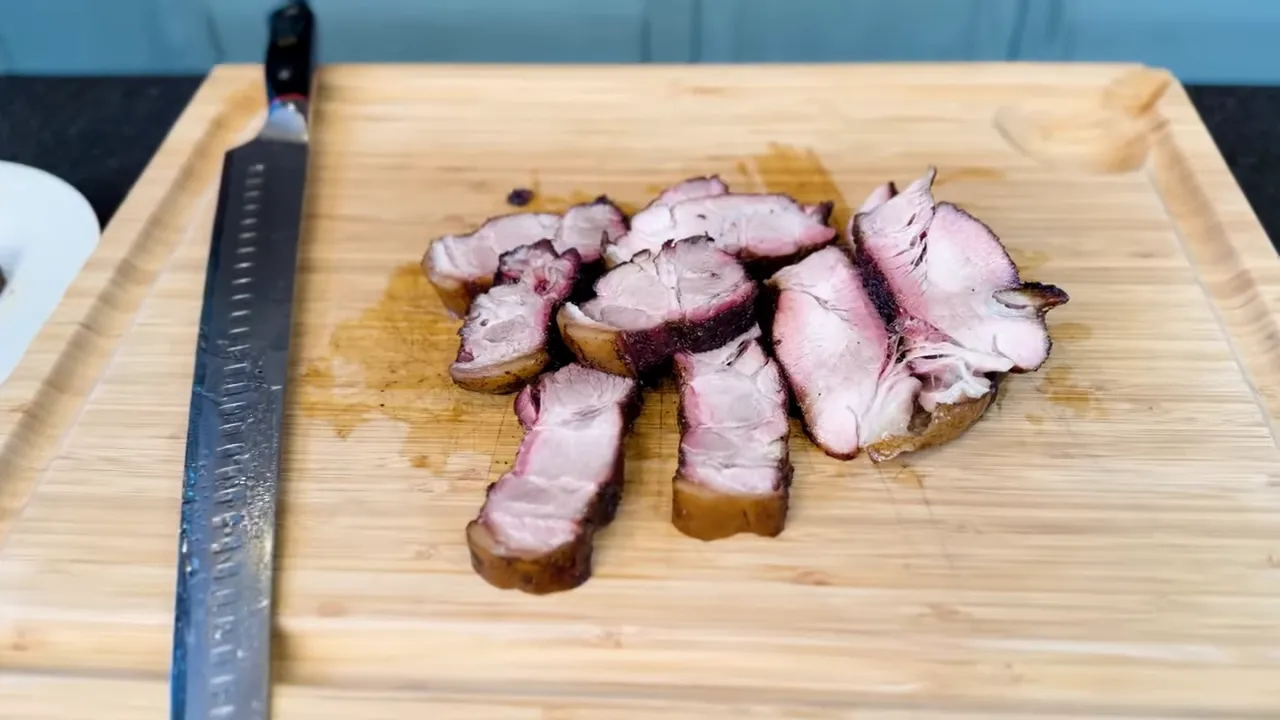
The first bite made the biggest result obvious: the flavor of cooking directly over coals came through in spades. I went back for another bite without adding finishing sauce. It simply did not need it.
The fat ate like butter, and the pork flavor was wonderfully pronounced. I would love to give all the credit for that extra porkiness to dry-aging, but I cannot honestly separate it from the other variables here. There was no fresh pork steak cooked alongside it as a control.
What I can say with confidence is that the combination worked beautifully: thick shoulder steaks, simple seasoning, post oak coals, regular mopping, and a butter-assisted rest.
My verdict is two thumbs up for the LSG as a vertical, direct-coal cooker. The available height makes this configuration useful, and the finished pork was outstanding. The next improvement is not making it cook better so much as making the supply of wood coals easier to maintain.
It is another genuinely useful capability from a grill that keeps refusing to fit into just one category. Don’t be afraid to fire it up.
A Note on Temperature Gear
ChefsTemp sponsored this cook. I first became a customer through the X10 instant-read thermometer, which I have continued using for its performance, build quality, and value.
For anyone interested in upgrading an analog smoker, the ProTemp S1 is more than a digital replacement gauge. Paired with the optional Breezo fan and information from up to four independent probes, it can take over fire-management duties on compatible setups. That is a separate capability from the manual wood-fire management I used for these pork steaks.
|


