Bacon ribs might be the best bite of barbecue I have ever made. You get the richness of pork belly, the texture of a proper rib, a peppery bark, and a buttery maple glaze that brings everything together.
But there is a catch. Nothing hurts quite like spending a week curing pork, putting in a full day at the smoker, and discovering that your masterpiece tastes like a deer lick.
I have had both the amazing bacon cooks and the painful bacon fails. This approach tackles the three things that make the biggest difference: getting the cure right, managing the salt, and breaking a long cook into predictable stages. It is my home adaptation of the legendary LeRoy & Lewis bacon rib, with a competition-style finishing technique that makes excellent use of every drop of those pork juices.
What You'll Learn
- Belly-on ribs provide the thick meat and fat needed for this bacon-style barbecue cook.
- A cold freshwater soak and salt-free rub help control salt after curing.
- Separate smoke development, bark formation, overnight holding, and glazing into manageable stages.
- Reserved wrap juices become a buttery maple bath that coats every sliced rib.
Table of Contents
- What Are Bacon Ribs?
- Plan Backward From Serving Day
- Start With a Properly Measured Bacon Cure
- Keep the Bacon Flavor, Lose the Excess Salt
- My Salt-Free Bacon Rib Rub
- The Four-Stage Bacon Rib Smoking Plan
- How I Set Up the Big Green Egg for Better Smoke
- Smoke Until the Bark Is Ready
- Wrap With Clarified Butter and Brown Sugar
- Make the Bar-A-BBQ-Style Rib Glaze
- Serving Day: Refresh, Slice, Dunk, and Set
- Why These Bacon Ribs Are Worth the Wait
What Are Bacon Ribs?
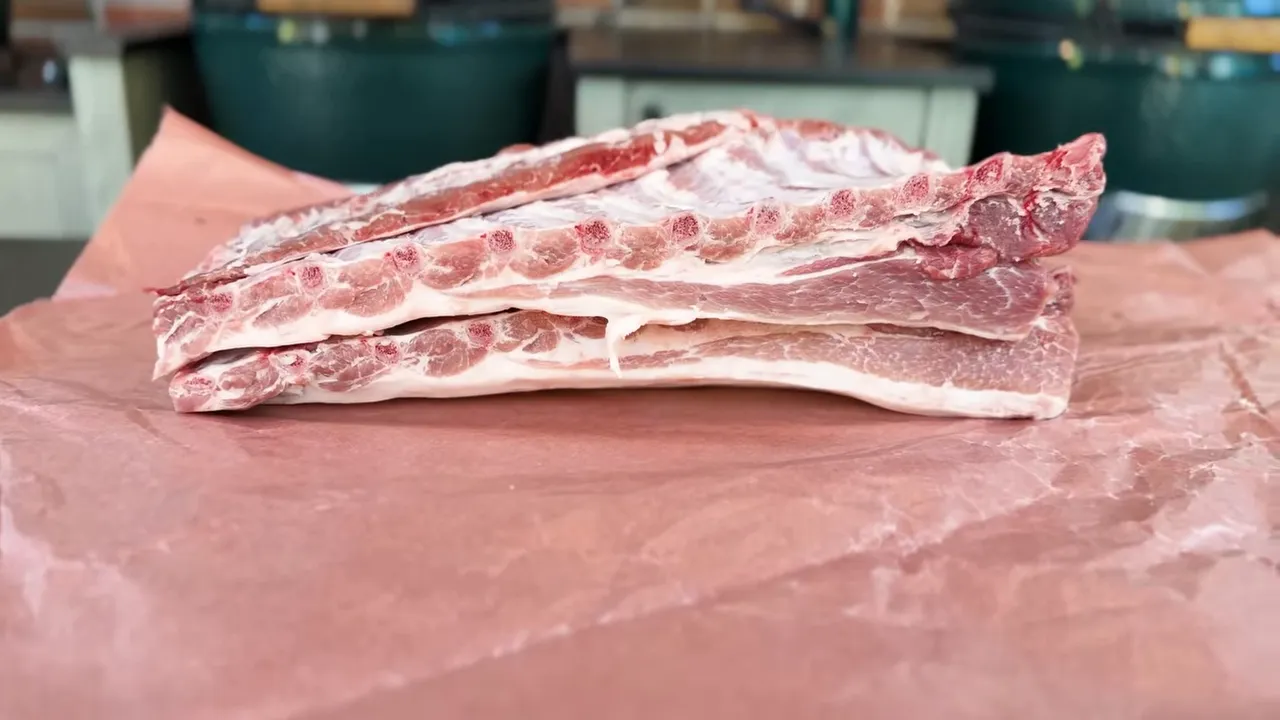
Think of this cut as St. Louis-style pork ribs with the belly still attached. That is an oversimplification, but it tells you what to look for: a much thicker slab than an ordinary rack, with enough belly meat to cure into bacon.
The belly supplies the rich, fatty bacon character. The rib underneath gives you that satisfying barbecue bite. Regular St. Louis ribs do not have the same generous belly layer, so getting the right cut matters before you do anything else.
Plan Backward From Serving Day
This is not a Saturday-morning impulse cook. Most of the time is hands-off, but you need to reserve it.
- Curing: Allow the full curing period required by your verified recipe. My cook used a seven-day wet cure.
- Desalting: Reserve two to four hours for a cold freshwater soak.
- Drying: Allow about one to one and a half hours uncovered in the refrigerator, or dry overnight.
- Smoking: My racks took approximately five hours before wrapping.
- Overnight finish and hold: Keep the wrapped ribs in a temperature-controlled oven with a probe monitoring the meat.
- Serving day: Allow time to refresh the bark, warm the glaze, slice, dunk, and set the coating.
Count elapsed time, not calendar labels. Starting a cure on Sunday afternoon does not mean it has completed seven full days when you wake up the following Sunday. I gave myself until the following Monday rather than shortchanging the cure.
Start With a Properly Measured Bacon Cure
The first lesson is patience. Thick belly-on ribs need the cure to reach the center, not just color the outer layers. The second lesson is containment. A curing bag sitting directly on a refrigerator shelf is one puncture away from a cleanup you will remember forever.
I put the bag inside a sturdy prep tub. That extra layer catches leaks and keeps a small problem from becoming raw-pork-juice spill gate.
The wet-brine method
For this cook, I made a nine-cup water brine, split between six cups of ice-cold water and three cups of freshly boiled water. The hot portion dissolved the dry ingredients; the cold portion helped bring the temperature back down.
The brine included packed brown sugar, kosher salt, garlic powder, pink curing salt, a couple of bay leaves, and peppercorns. The measured additions demonstrated were three-quarter cup kosher salt, one tablespoon garlic powder, and three teaspoons pink curing salt.
Important: those measurements are not a complete, independently usable curing formula. The meat weight, curing-salt specification, and brown-sugar quantity are not established here. Do not treat three teaspoons of curing salt as a universal dose for any rack of ribs. Use a verified bacon-curing recipe matched to your meat weight and the exact curing product, and follow its directions for concentration, refrigeration, and curing time. Pink curing salt is not interchangeable with ordinary pink table salt.
For background on safe preservation practices, the National Center for Home Food Preservation is a useful reference.
- Dissolve the measured ingredients from your verified curing formula in its hot-water portion.
- Combine that solution with the cold water.
- Chill the brine thoroughly before adding the pork. Even after adding ice-cold water, mine needed additional chilling.
- Bag the ribs with the cold brine, place the bag inside a leak-catching tub, and refrigerate for the prescribed curing period.
The point of splitting the water is convenience, not permission to put raw pork into warm brine. Get the brine cold first.
Keep the Bacon Flavor, Lose the Excess Salt
The cure is only the first opportunity to get this right. My two biggest improvements happen after curing: a freshwater soak and a salt-free rub.
Give the ribs a cold freshwater soak
After removing the ribs from the curing bag, I rinsed them with clean, cold water and submerged them in fresh water with ice.
For this cook, I soaked them for four hours and changed the water halfway through. Two hours is the minimum I use for this desalting step. Keep the pork cold throughout, using refrigeration or enough ice to maintain a safe temperature.
This is about reducing excess salt, not correcting an incorrectly measured cure. A freshwater bath cannot make an unsafe curing formula safe.
You will find plenty of discussion about equilibrium curing and whether bacon can become too salty. My practical experience is that this rinse-and-soak step gives me a result I enjoy much more. After waiting a week, I am happy to spend a few extra hours protecting the final bite.
Dry the surface before seasoning
After soaking, rinse again, pat the racks dry with paper towels, and return them to the refrigerator uncovered. I allowed about an hour to an hour and a half. Overnight is another option if your schedule allows.
You want a dry surface before applying the rub, not a rack dripping with soaking water.
My Salt-Free Bacon Rib Rub
My usual Texas-style seasoning blends ideas from Goldee’s, Black’s, and Franklin. Normally, salt and seasoned salt are part of that mix. For cured bacon ribs, they stay on the shelf. Trust me, you have been warned.
- 6 tablespoons freshly cracked black pepper
- 1½ tablespoons paprika
- ½ tablespoon cayenne
- 1 tablespoon granulated onion
- 1 tablespoon granulated garlic
- 2 tablespoons coarse garlic
- 2 tablespoons crushed red pepper flakes
Shake everything together and coat the dried ribs. The coarse garlic and red pepper flakes give the seasoning some texture, while the pepper supplies that familiar barbecue backbone.
Do not add the salt or Lawry’s from a conventional rib-rub recipe. The cured pork already brings the salt.
I also leave sugar out of this stage. We will add plenty of sweetness later, where it belongs, rather than exposing a sugary coating to the entire smoke and risking a burnt flavor.
The Four-Stage Bacon Rib Smoking Plan
The basic progression works across smokers. I have used versions of this approach on pellet grills, gravity smokers, offsets, charcoal grills, Kamado Joe grills, and Big Green Eggs. The fire management changes, but the jobs stay the same:
- Build smoke flavor: Run a low-temperature smoke stage around 200°F to 225°F.
- Develop the bark: Raise the cooker to approximately 270°F to 300°F.
- Wrap for the overnight finish and hold: Add clarified butter and brown sugar.
- Finish for serving: Refresh the bark, slice, dunk in warm glaze, and return to the smoker until tacky.
I sometimes call the first stage “cold smoke,” but 200°F to 225°F is not true cold smoking. It is a low-temperature cooking stage focused on smoke flavor.
How I Set Up the Big Green Egg for Better Smoke
For this cook, I used an extra-large Big Green Egg. The goal was a small, clean-burning wood fire, with enough access to feed it without dismantling the entire cooking setup.
Start with a small coal bed
I shook the leftover ash out of the charcoal basket and emptied the ash collection can. Then I lit only a few pieces of lump charcoal, enough to establish a useful coal bed for small wood splits.
Initially, one split at a time maintained the fire. As the starter charcoal burned down, I needed two splits to stay around 200°F to 225°F. I staged upcoming splits near the front of the basket so they could preheat before going onto the fire.
Wait for clean combustion before installing the heat deflectors. You want burning wood, not a pile of splits struggling to smolder.
Leave yourself access to the fire
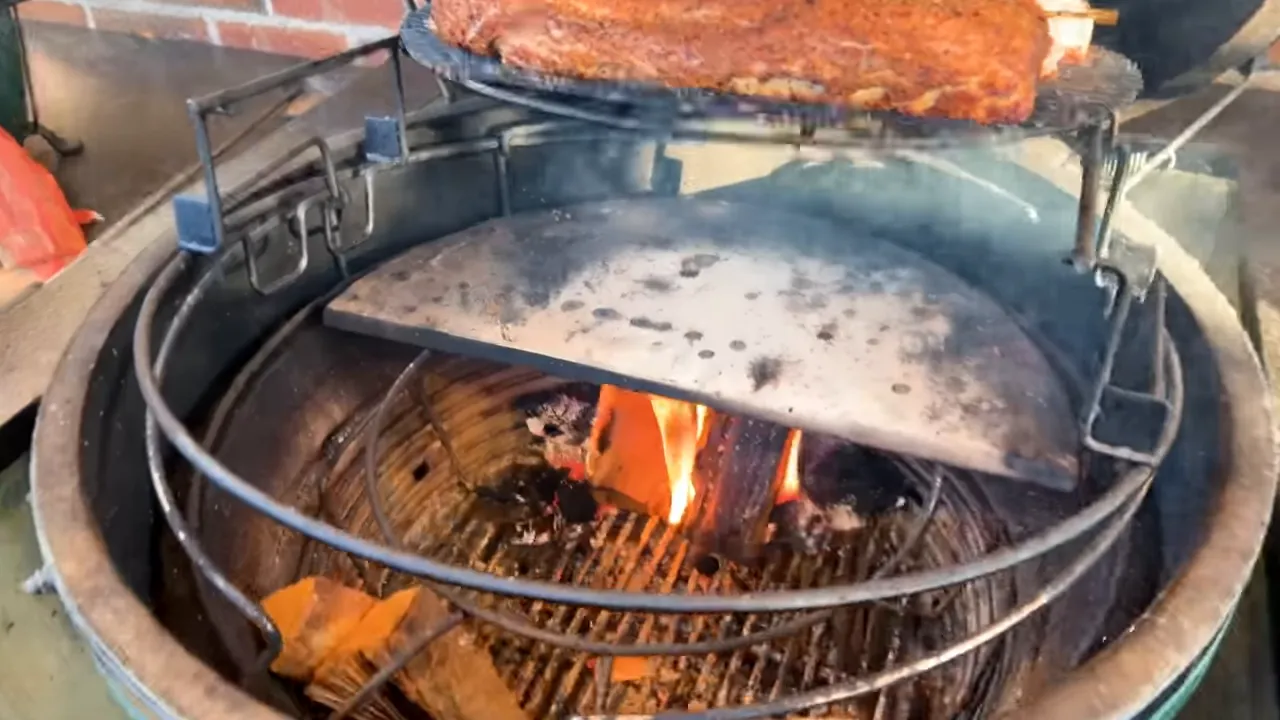
On an older Egg or another kamado without a sliding upper rack, use a half-moon deflector and a half grate. That gives the food indirect protection while leaving room to add wood.
With the Eggspander, I prefer the upper sliding rack. It creates more distance between the live fire, the deflector, and the food. It also gets the ribs higher into the dome, where I have found better smoke contact. A university computational fluid dynamics study I commissioned supported that preference.
I pushed the first deflector toward the back to block flames from coming up behind the ribs. Because these racks were large, I used a second deflector to protect the extra cooking area. Heat-resistant gloves made it possible to move that second stone when adding wood.
Control the fire without choking it
During this low-temperature wood-burning stage, my bottom vent was open about one finger’s width and the top vent was fully open to encourage draw. Those were settings for this particular cooker and fire, not universal positions for every kamado.
I tracked the temperature curve with a probe and added wood after the cooker fell roughly 10°F below its holding temperature. That little drop left room for the fresh wood’s heat without overshooting.
Wood additions were roughly every 40 minutes, but the temperature trend mattered more than the clock.
Do not chase a low temperature by suffocating the wood. There is a big difference between a clean, actively burning fire and smoldering wood trapped in a poorly ventilated kamado.
Smoke Until the Bark Is Ready
I ran the wood-split stage for about two hours, then switched to charcoal with a piece of smoking wood. That made the rest of the cook much easier to manage.
During the hotter stage, aim for approximately 270°F to 300°F and let the bark develop. If an area starts looking dry, a light spritz of apple cider vinegar and water can help. I do not spray just because a timer tells me to.
My racks were ready to wrap after about five hours total: two hours over the wood fire and roughly three more over charcoal.
The intended wrapping window was around 165°F to 175°F internal, with the bark established. Mine went slightly beyond that while I waited for the color I wanted. This is a wrapping checkpoint for the overnight method, not a universal finishing temperature for ribs.
Wrap With Clarified Butter and Brown Sugar
Now we can bring in the sweet ingredients. Rather than putting sugar through the entire smoke, I add it inside the foil with clarified butter. That mixture also becomes the foundation of tomorrow’s glaze.
- Lay out two sheets of aluminum foil for each rack.
- Add a couple of spoonfuls of clarified butter and a layer of brown sugar.
- Place the rack meat-side down on that mixture.
- Add more clarified butter and brown sugar to the bone side.
- Seal the foil tightly and place the packets on a rimmed tray.
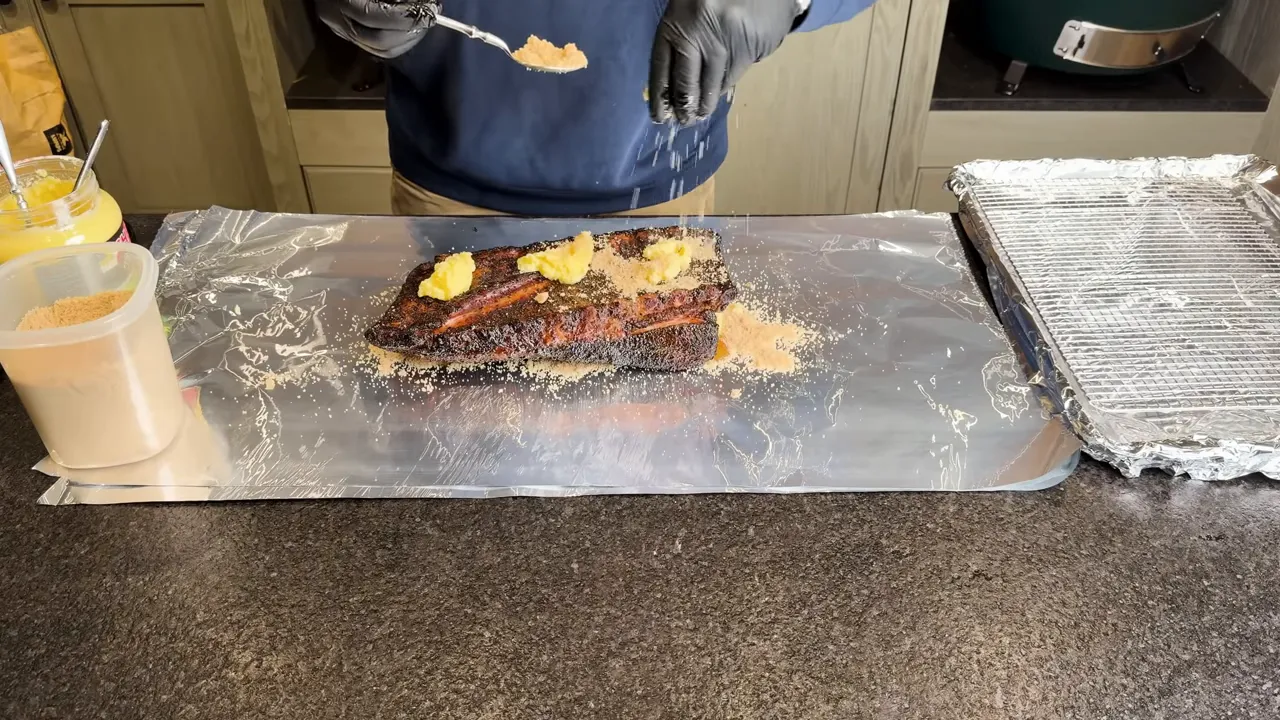
Hold the packets bone-side up, meat-side down. And keep those liquids inside. Tomorrow, that butter, dissolved sugar, and rendered pork fat will be liquid gold, pork edition.
Verify the overnight holding temperature
My oven was set to 150°F. That is the oven setting, not a promise that every oven will keep the food at the same temperature.
The critical check is the meat itself: keep the pork above 140°F throughout the hot hold. Leave a probe in place and verify how your oven behaves. Adjust the setting as needed rather than trusting the display.
This method uses the extended wrapped period to continue tenderizing the ribs instead of taking them all the way to their usual finishing point on the smoker. An overnight hold is not a substitute for a properly controlled cooking process. If your equipment cannot reliably maintain safe holding temperatures, do not improvise an unattended low-temperature hold. The USDA’s smoking and food-safety guidance provides useful supporting information.
Make the Bar-A-BBQ-Style Rib Glaze
The finishing bath uses about half a liter of rib glaze. You can use a prepared glaze, or make this Bar-A-BBQ-style version. The batch makes just over a liter, so you will have more than you need for the dunking mixture.
- 1¼ cups ketchup
- ⅓ cup brown sugar
- ⅓ cup white sugar
- ⅔ cup honey or maple syrup
- ⅓ cup apple cider vinegar
- ⅓ cup white vinegar
- ⅓ cup water
- ⅓ cup Worcestershire sauce
- 2 teaspoons black pepper
- 2 teaspoons cumin
- 2 teaspoons onion powder
- 2 teaspoons garlic powder
Mix thoroughly until incorporated. Maple syrup is particularly good here, and it mixes more easily than honey.
Serving Day: Refresh, Slice, Dunk, and Set
You have three finishing options. The easiest is to slice and serve directly from the hot hold once the ribs are tender. The LeRoy & Lewis approach includes slicing after the overnight hold, seasoning the newly exposed meat, and returning the individual ribs to the smoker.
My preferred finish borrows from Steve Gow of Smoke Trails BBQ, whose approach I enjoyed while joining his Memphis in May competition team. It reuses everything saved in the foil.
Build the buttery maple dunking bath
Carefully pour the liquids from the foil packets into a grill-safe pan. For my two-rack cook, I combined:
- All the reserved clarified butter, brown sugar, and pork drippings
- Approximately 500 milliliters rib glaze
- Approximately 250 milliliters maple syrup
I used spicy maple syrup because I love that little kick alongside the sweetness. Regular maple syrup works too.
Stir the mixture well and warm it on the smoker. We are coating hot ribs, so there is no reason to dunk them into cold sauce.
Refresh the bark before slicing
Refire the smoker and establish clean smoke before returning the racks. I added fresh smoking wood during startup, then put the ribs back on to touch up the bark after their night resting meat-side down in liquid.
Mine needed about 35 to 40 minutes. The sauce warmed alongside them for roughly 30 minutes.
This stage is not about repeating yesterday’s cook. The bark needed attention, but the internal temperature changed only a degree or two. The long overnight period had already done the tenderizing work.
Coat every side of each rib
- Remove the racks and slice between the bones into individual portions.
- Dunk each rib in the warm buttery maple mixture, coating all sides.
- Return the ribs to the smoker.
- Let the coating tack up before serving.
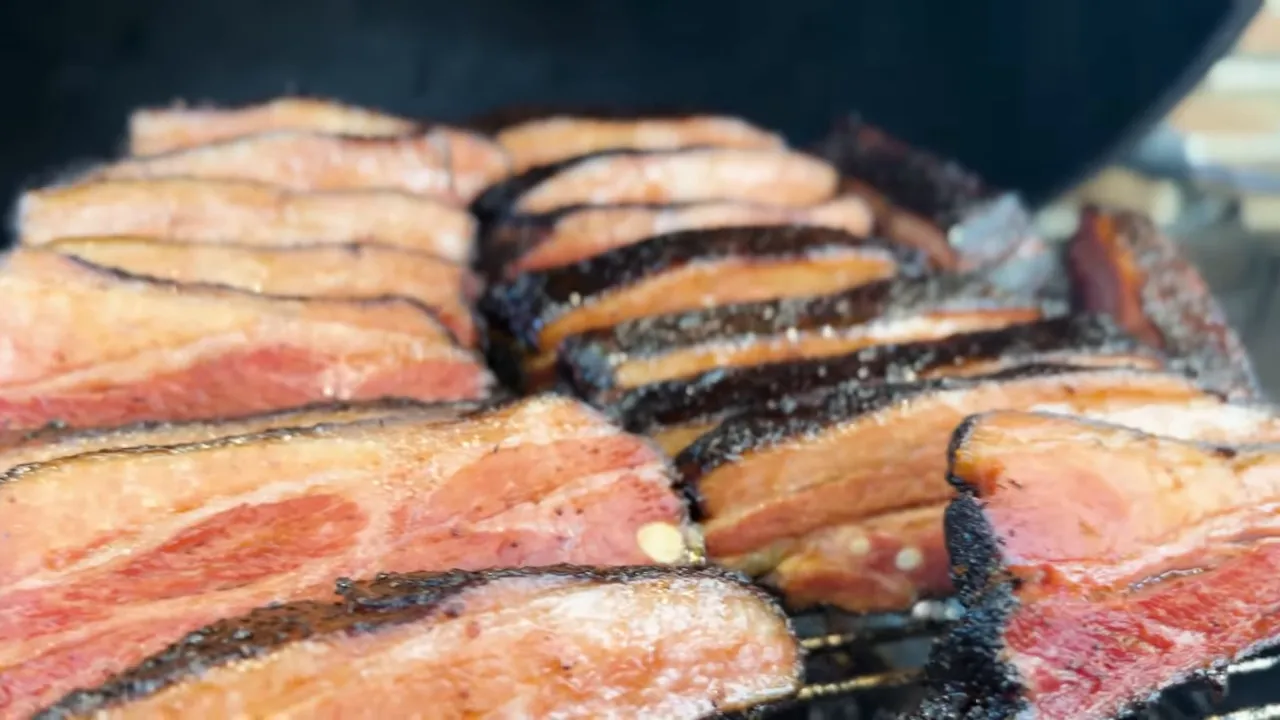
Use the appearance of the coating rather than inventing a rigid finishing time. You want it clinging to the ribs, not simply running off them.
Why These Bacon Ribs Are Worth the Wait
The first bite stopped me in my tracks. Before I had even finished serving, I was calling people nearby because this was something they needed to taste.
What makes it work is the layering: cured bacon flavor, rich belly meat, pepper and garlic, clean smoke, buttery pork juices, barbecue glaze, and maple sweetness. Somehow, all of it lands in one ridiculous bite.
It reminds me more of Memphis in May competition barbecue than the simple salt, pepper, and smoke associated with so much Texas barbecue. This is not restraint. This is building the ultimate bite.
Could I eat an entire rack? That is a different question. These are rich in the way a whole package of bacon is rich, which makes them especially good for sharing.
The extra time pays off, but the biggest improvements are not complicated: use a properly measured cure, give the ribs a cold freshwater soak, skip salt in the rub, build a clean fire, and save the sweetness for the wrap and finish. Get those details right, and bacon ribs become a very serious contender for your next neighborhood barbecue crown.
Thanks to Dalstrong for sponsoring this cook. Their knives are my go-to for sharpness, reliability, and designs that make me want to get back to the cutting board.
|


