I smoked six racks of ribs on six smokers to answer a question that sounds simple: does low and slow actually make better ribs than hot and fast?
The biggest lesson was not that one temperature wins every time. It was that copying a pitmaster’s temperature without accounting for your own smoker can hold your barbecue back. A huge restaurant offset and a backyard kamado do not burn the same amount of fuel or move air through the cooking chamber in the same way.
Low and slow produced the standout rib in this test. But the offset comparison split opinions, and the pellet and gravity charcoal ribs were surprisingly close. That is exactly why I like putting assumptions on the cutting board instead of treating them as barbecue law.
Disclosure: This cook was produced with free product or sponsorship support from Big Green Egg, Smoke North, and Masterbuilt. My goal is useful barbecue education for owners of any brand.
Key Takeaways
- The low-and-slow XL Big Green Egg ribs were both guests’ favorite overall.
- The offset comparison split preferences, and its hot-and-fast sample tasted smokier.
- The Traeger and Masterbuilt samples were close, but the comparison changed both fuel and cooker.
- I favor building smoke early, then increasing heat when the cooker and food benefit.
Table of Contents
- Why I Stopped Treating BBQ Temperatures as Rules
- The Six-Sмoker Rib Test: Equipment and Temperatures
- How I Prepared and Cooked the Ribs
- A Double-Indirect Setup Clarification for Big Green Egg Owners
- The Blind Taste Test Results
- What I Would Change in My Own Backyard
Why I Stopped Treating BBQ Temperatures as Rules
When I started cooking barbecue about 20 years ago, I would read an interview with Aaron Franklin, find a temperature, and immediately try it in my backyard. Guilty as charged.
Since then, I have encountered excellent barbecue made with very different approaches. La Barbecue cooks hot and fast. My time cooking alongside Cooper at Bar-A-BBQ reinforced how effective a lower-temperature smoke phase can be. Those approaches make sense within their respective equipment and processes. Neither automatically becomes the right answer for every backyard smoker.
Several variables change what a temperature actually does to your food:
- The size and shape of the cooking chamber.
- How much air moves through the smoker.
- The type and amount of fuel being burned.
- Where the meat sits relative to the fire and heat deflectors.
- The smoke intensity your family enjoys.
I had a memorable conversation with Tuffy Stone at Memphis in May, where I joined Steve Gow’s competition team. Tuffy told me he regretted publishing the 3-2-1 rib method because so many people had latched onto it as a fixed formula.
My takeaway was not that a familiar method is useless. It is that a guideline stops helping when I refuse to adapt it to the food and cooker in front of me.
The Six-Sмoker Rib Test: Equipment and Temperatures
I divided the six racks into three comparisons:
- Kamados: Two XL Big Green Eggs, with one rack cooked low and slow and the other hot and fast.
- Offsets: Two Smoke North smokers, the Echo and Trillium, with one rack cooked by each method.
- Smart grills: A Traeger pellet grill running low and slow against a Masterbuilt Gravity XT charcoal grill running hot and fast.
My low-and-slow target was approximately 220°F (104°C). The low-temperature Big Green Egg setup operated around 200 to 220°F (93 to 104°C). For hot and fast, I targeted 300°F (149°C), using the temperature approach discussed at La Barbecue.
Those are smoker operating targets, not internal meat temperatures. I also would not present them as a verified, identical grate temperature across all six cookers. Dome thermometers, smoker gauges, and electronic controller readings measure temperature in different places. That distinction matters when adapting this comparison to your own grill.
What this test could and could not isolate
The two XL Big Green Eggs gave me the closest equipment match. The offsets came from the same manufacturer but were different models. The final pair changed both fuel and cooker: pellets on the Traeger versus gravity-fed charcoal on the Masterbuilt Gravity XT.
That last comparison was useful as a backyard equipment comparison, but it was not a clean test of temperature alone. I also changed the fire and smoke approach between the two Eggs. The results compare complete cooking methods, not just two numbers on a thermometer.
Six racks and a small tasting group can reveal useful differences. They cannot establish a universal winner for every smoker, rack of ribs, or palate.
How I Prepared and Cooked the Ribs
1. Keep the seasoning simple
I wanted the cooking differences to come through, so I kept the seasoning consistent across all six racks: freshly cracked black pepper and seasoned salt.
I used my Pepper Cannon for a roughly 16-mesh pepper grind and Fiesta Season-It-All for the salt component. Lawry’s is another option I discussed. The point was not to build a complicated rub. It was to reduce the number of things changing between samples.
That simplicity was something I brought home from talking with John Bates at Interstellar BBQ. Fewer variables make it easier to get consistent results and understand what caused a difference.
Freshly cracking pepper for hundreds of racks is a different proposition from seasoning a few racks in the backyard. At my scale, I find the extra effort worthwhile.
2. Cook high in the kamado dome
On both XL Big Green Eggs, I placed the ribs on an upper cooking rack.
Over many cooks, I have preferred the results from food positioned higher in a kamado dome. Pork shoulders cooked on two levels were one of the clues that led me to investigate this further. Computational fluid dynamics work I discussed also supported advantages to that higher placement.
I treat that as a useful starting point from my experience, not a promise that every rack configuration performs identically in every kamado.
3. Use different fire setups for the two Egg methods
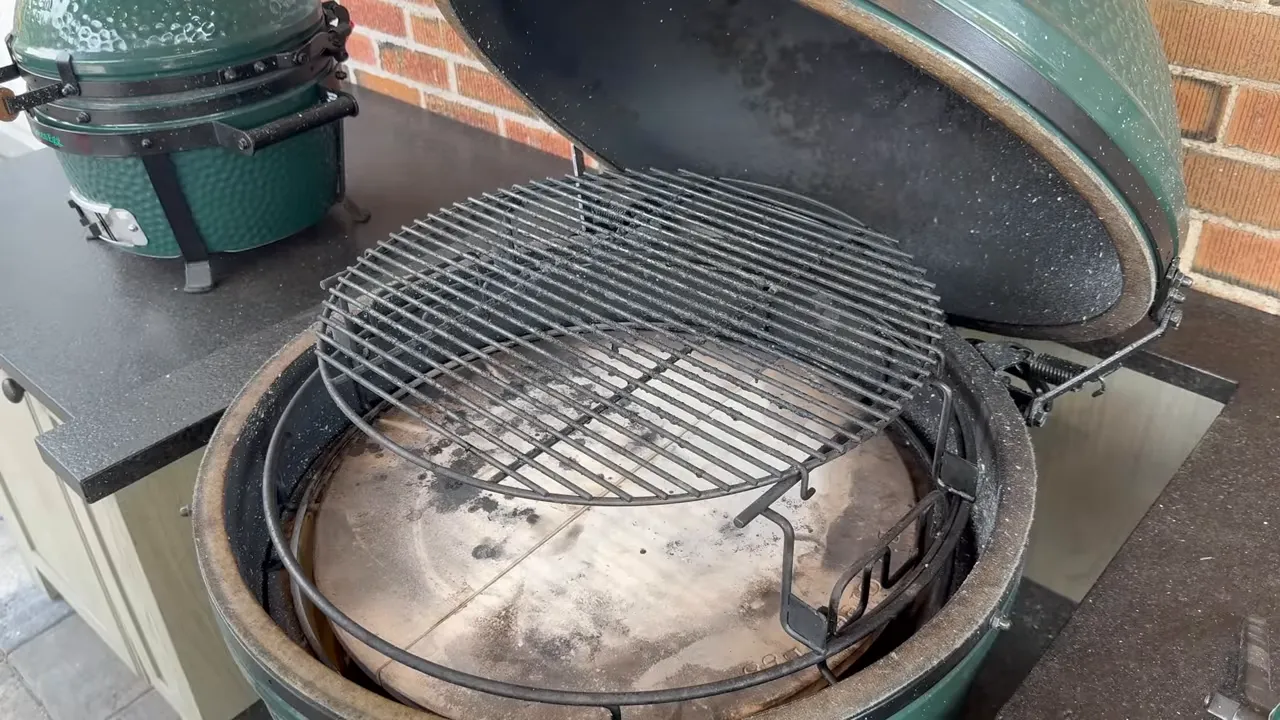
For the hot-and-fast Egg, I installed the EGGspander rack with deflector plates in the lower position and the ribs on the upper level. I deliberately left out my usual double-indirect arrangement because this cook was not intended to compare double indirect with standard indirect cooking.
For the low-and-slow Egg, I repeated the wood-burning approach I had used at Bar-A-BBQ. The upper rack let me slide the cooking surface back to access the fire and feed small wood splits.
On that particular setup, I used a bottom vent opening of about a pinky’s width and left the top vent fully open. That gave me roughly 30 to 40 minutes between wood additions while operating around 200 to 220°F (93 to 104°C).
Those vent positions describe what worked during my cook, not universal settings. Fuel, weather, grill size, and accessory placement all affect the result. Use only fuel and configurations permitted by your grill manufacturer, and do not assume a demonstrated wood-fire arrangement is approved for every ceramic cooker.
4. Spritz only when the surface needs it
I used a mixture of apple cider vinegar and water if a rack started looking dry on the surface. I did not make a spritzing timetable the controlling factor. The condition of the ribs determined whether they needed attention.
5. Coordinate the racks for a side-by-side tasting
Getting six racks cooked by two methods on six smokers to finish at precisely the same moment was not realistic. Your boy’s good, but not that good.
My coordination plan was to smoke each rack until the bark had set, which I expected around 155 to 165°F (68 to 74°C) internal meat temperature. I then wrapped the ribs meat-side down with a little ghee. Tallow was another option I mentioned.
I used an adjustable oven with the intention of keeping the ribs themselves around 150°F (66°C) until lunch. That holding step was a compromise to make the tasting possible, and it is another variable to keep in mind when interpreting the results.
This is not a complete cooking or extended-holding recipe. Bark setting is not the same as finished tenderness, and neither substitutes for verifying food safety. Do not assume that transferring ribs at the wrapping temperature into a low oven completes the cooking process. Use verified food temperatures, equipment suitable for holding, and applicable safe cooking guidance. An oven setting alone does not establish the temperature of the food.
A Double-Indirect Setup Clarification for Big Green Egg Owners
Although I did not use double indirect for the comparison, I wanted to clarify two arrangements I have used. Both place a second heat barrier above the first, with an air gap between them.
Option 1: convEGGtor, spacers, and pizza stone
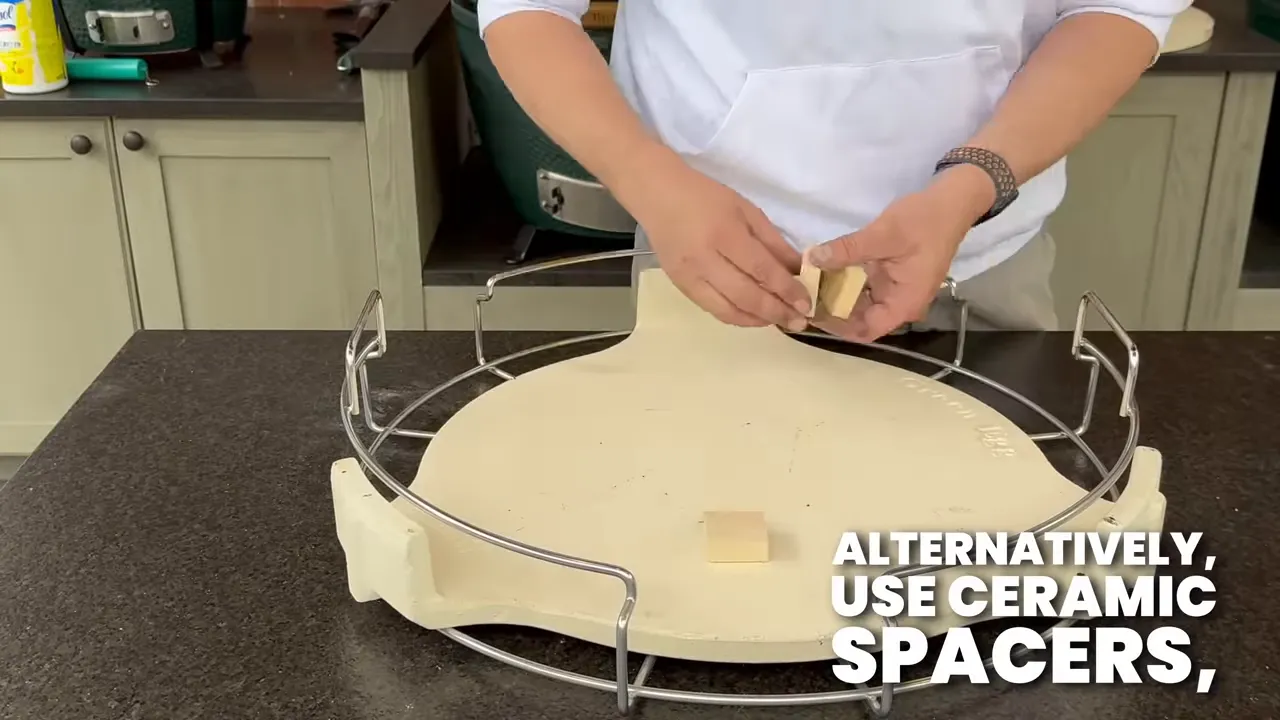
One arrangement uses the convEGGtor with approximately ½ inch (13 mm) of spacing beneath a pizza stone. I demonstrated ceramic spacers and discussed an earlier arrangement on a Primo Oval XL using a stainless steel grate as the spacer.
The advantage I observed was fairly uniform stone surface temperatures when checked with an infrared thermometer or thermal camera, without lowering another deflector into the charcoal space.
Option 2: a lower spider rack and two deflector levels
The alternative uses a spider accessory rack hanging below the EGGspander. On my XL Big Green Egg, I used smaller, Large-size half-moon deflectors on that lower rack, with the upper deflectors supported above them.
The trade-off is charcoal capacity. The lower hardware occupies space that could otherwise hold fuel, and the lower stones sit closer to the fire.
In my infrared checks, I observed roughly a 200°F temperature difference, equivalent to about 111°C, between the lower stones near the charcoal and the upper stones beneath the food. These were stone surface observations, not dome, grate-air, or meat temperatures.
I also caught an error in my own arrangement: I had aligned the seams of the upper and lower half-moon deflectors. The thermal image showed a pronounced hot seam. Rotating one pair so the seams cross rather than line up reduces that direct heat path.
These are accessory configurations I have experimented with, not a blanket endorsement of improvised hardware. Use compatible, heat-rated parts, preserve the necessary clearances, and check the grill and accessory manufacturers’ limits before assembling either arrangement.
The Blind Taste Test Results
I labeled the samples 1A through 3B and kept a separate key identifying the cooker and method. My two friends received sheets with sample codes but no equipment information. I mixed the order of the methods so that “A” did not always mean low and slow.
The useful comparison was within each pair. Comparing every sample against the first rib would have made it harder to separate the temperature question from the equipment differences.
Pair 1: XL Big Green Egg, low and slow wins clearly
- 1A: Low and slow on the XL Big Green Egg, using the wood-burning approach.
- 1B: Hot and fast on the other XL Big Green Egg.
Both guests chose 1A, and each identified it as his favorite rib overall.
The big difference was smoke flavor. One guest initially placed 1A around an eight or nine out of ten for smoke. The hot-and-fast rib was still good, but the low-and-slow sample overshadowed it for this smoke-loving group.
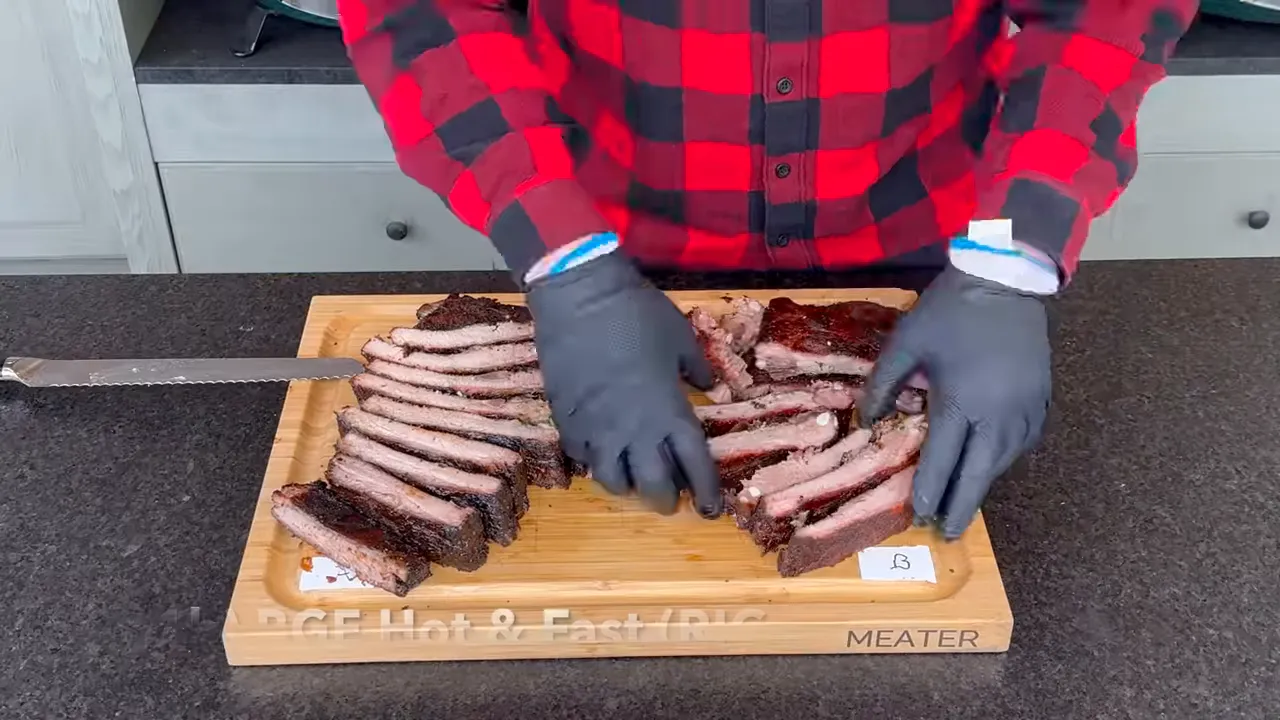
Interestingly, the group noticed a somewhat more pronounced smoke ring on 1B even though 1A tasted much smokier. The appearance of the smoke ring did not tell us which rib had the stronger smoke flavor.
My practical takeaway: if you enjoy a pronounced smoke profile, this lower-temperature, wood-fed Egg method is worth exploring within your equipment’s approved operating limits. The result does not establish that temperature alone caused the difference.
Pair 2: Smoke North offsets, a split decision
- 2A: Hot and fast on a Smoke North offset.
- 2B: Low and slow on a Smoke North offset.
This pair is where a neat “low and slow always wins” conclusion falls apart.
The group found a substantial smoke difference, but the hot-and-fast 2A sample tasted smokier. It also had a dark bark that one guest particularly enjoyed.
The other guest preferred 2B because its milder smoke and seasoning felt better balanced to him. I also chose 2B, making low and slow the two-to-one preference in this pair.
One guest described 2B as the kind of rib that might appeal to a broad group: enough smoke to taste like barbecue, without making smoke the dominant feature. That was his impression, not the result of testing a hundred people.
The backyard lesson is important: more smoke and better ribs are not interchangeable. Even among people who enjoy smoke, the preferred balance can differ.
Pair 3: Traeger pellets versus Masterbuilt Gravity XT charcoal
- 3A: Low and slow on the Traeger pellet grill.
- 3B: Hot and fast on the Masterbuilt Gravity XT.
This was the closest pair in flavor, texture, and bark. The group liked the mahogany appearance, particularly on the pellet-cooked rack, and found salt and pepper more prominent than smoke.
One guest leaned toward 3A for texture. The other was close to indifferent, with a slight preference toward 3B. There was no convincing runaway winner.
An initial comment about a drier-feeling bite from 3B did not hold up consistently when another piece was tried, so I would not turn that into a finding about the Masterbuilt.
Both samples tasted smoked on their own. But returning to a rib from the first pair made the difference in smoke intensity obvious again. For this group, neither 3A nor 3B matched the smoke impact of the standout Egg rib.
Because this pair changed fuel, cooker, and temperature together, I cannot use it to claim that pellets and charcoal are equivalent or that temperature makes no difference.
What I Would Change in My Own Backyard
The result reinforces my preference for a hybrid approach: build the smoke profile early, then cook hotter when it suits the food and smoker.
Some newer Traeger models offer a Super Smoke mode. Where available, that is one way to explore a lower-temperature smoke phase before increasing the cooking temperature, following the model’s instructions.
On larger kamado cooks such as pork shoulders, I have had good results starting with a lower-temperature, actively tended smoke phase, then moving to a more conventional indirect setup and increasing the heat. That lets me stop feeding small splits every 30 to 40 minutes once I have built the smoke character I want.
I have sometimes described the first phase using Cooper’s “cold smoking” terminology. To be clear, the 200 to 220°F (93 to 104°C) approach discussed here is a hot-smoking cooking process, not a true cold-smoking or curing method.
The hybrid approach was not a seventh rack in this experiment, so I am not claiming this tasting proved it superior. It is the practical direction I favor from my broader cooking experience.
How I would run a useful comparison at home
- Start with your own cooker. Try the two approaches on the same model before drawing conclusions from somebody else’s equipment.
- Keep the seasoning consistent. Make it easier to identify differences caused by the cooking method.
- Record where temperatures are measured. A dome reading and a grate reading should not silently become the same number in your notes.
- Taste side by side when practical. Comparing bites directly was much more revealing than relying on memory.
- Choose for your household. Record smoke intensity separately from overall preference.
I came into this wanting to challenge rigid barbecue rules, and the ribs gave me good reason to keep challenging them. Low and slow delivered our favorite rack, but the offset split reminded me that preference is more complicated than a temperature label.
Find out what your smoker does well. Find out how much smoke your family enjoys. Then keep the parts of each method that help you make better barbecue. There is no need to make a religion out of a thermometer reading.
And do not be afraid to fire it up.


