I expected a difference between a dry-aging bag and a dedicated dry-aging fridge. I did not expect the difference to be this big.
Both promise deeply flavored, tender dry-aged steak at home. One is a relatively inexpensive bag that goes into your existing refrigerator. The other is a specialized appliance with temperature control, humidity control, and UV treatment. After roughly 40 to 45 days of aging beef from the same New York strip loin, one delivered a juicy, almost buttery steak. The other had dry-aged flavor, but a chew that headed a little too far toward beef jerky.
For me, the dedicated fridge won decisively. But the useful part of this comparison is understanding why, what the extra money buys, and where home dry aging still demands caution.
Table of Contents
- Key Takeaways
- The Test: One Strip Loin, Two Dry-Aging Methods
- What Dry Aging Is Actually Trying to Achieve
- Protection Matters, but No Appliance Makes Dry Aging Risk-Free
- Before Cooking: The Beef Already Looked Very Different
- How I Cooked the Dry-Aged Steaks
- The Taste Test: Dry-Aged Flavor Was Only Half the Story
- Is a Dedicated Dry-Aging Fridge Worth It?
Key Takeaways
- The dedicated dry-aging fridge produced a much juicier, more tender steak in this comparison.
- Controlled moisture loss matters more than simply drying the beef as much as possible.
- UV treatment does not guarantee safety or automatically make dry-aged trim suitable for consumption.
- An early temperature alert leaves room for a hot sear without overshooting the intended finish.
The Test: One Strip Loin, Two Dry-Aging Methods
I split a New York strip loin between two setups:
- Dry-aging bag: One portion went into a purpose-made membrane bag, sealed using the required suction pad, then onto a rack in our household refrigerator.
- Dedicated dry-aging fridge: The other portion hung inside my Pro Smoker Reserve 50, with controlled humidity and its UV feature activated.
The strip loin was a practical choice. The bone-in prime rib I initially considered would not fit the bags I had, and exposed bones can create another concern: puncturing the membrane.
This was also not a cheap piece of meat. The roast cost about $350 at the time of the test. When that much beef is sitting for weeks, consistency matters almost as much as the eventual steak dinner.
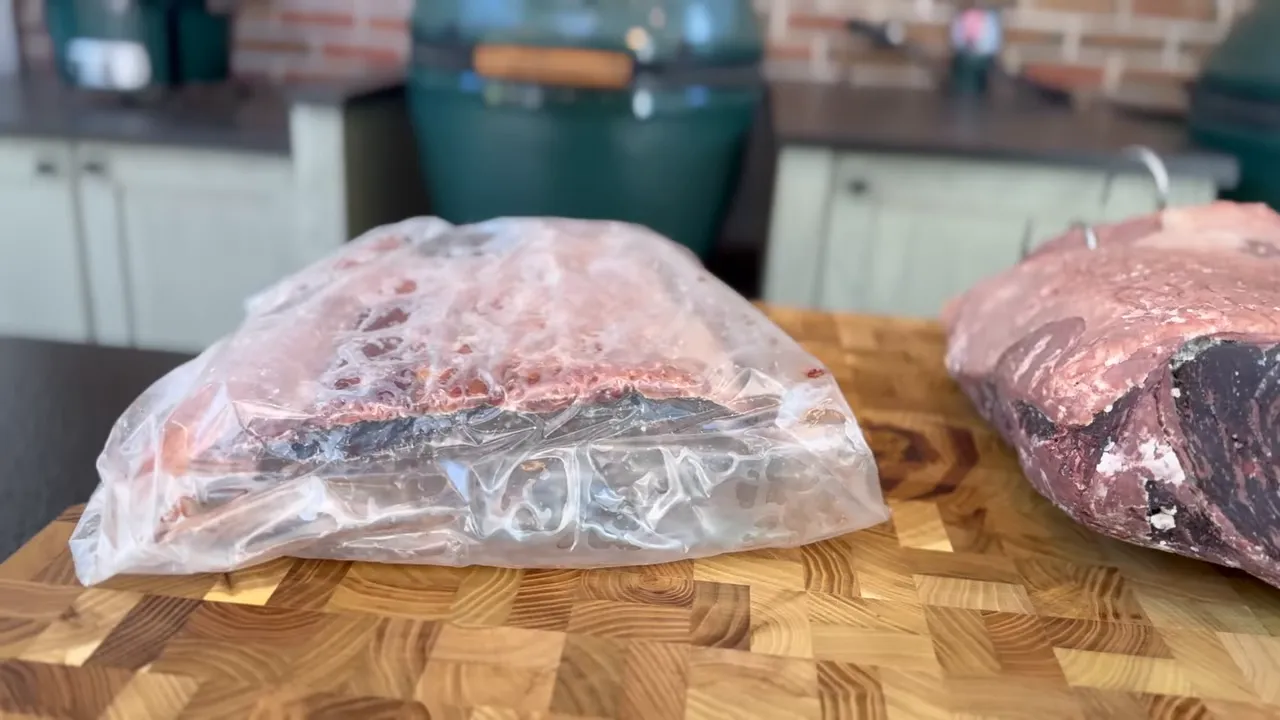
Both methods aim to make dry aging more manageable at home, but neither should be confused with simply leaving an uncovered roast in an ordinary refrigerator for several weeks.
What Dry Aging Is Actually Trying to Achieve
Dry aging combines moisture loss with changes driven by the meat’s own enzymes. The goal is more concentrated beef flavor alongside improved tenderness. The trick is controlling the process, rather than just drying the meat as aggressively as possible.
My favorite way to explain it is with a balsamic reduction. Reduce it gently and you concentrate the flavor into something delicious. Attack it with excessive heat and you can end up with a sticky, unpleasant mess.
The analogy is about controlled concentration, not heating beef during aging. More moisture loss is not automatically a better result. I still want steak at the end of this process, not a roast-sized piece of jerky.
Temperature and humidity do different jobs
Temperature control is fundamental to managing a perishable product over an extended period. Humidity helps control how quickly moisture leaves the beef.
For this test, I had the dedicated fridge set around 75% relative humidity. By comparison, the household-refrigerator range I discussed was roughly 30% to 50%. Those are percentages, not temperature readings.
That difference is important, but it does not establish an exact drying-rate multiplier. My working theory was that the drier household-fridge environment helped explain the bagged roast’s flatter shape and tougher exterior. The finished beef gave me a very good reason to investigate that further.
Why some restaurant dry-aged beef tastes different
Some professional aging rooms deliberately maintain established yeast and mold cultures. Those cultures can contribute distinctive flavors, including the blue-cheese-like character people sometimes associate with dry-aged beef.
That is a different undertaking from either setup here. Managing a cultured aging room safely is not something I want to improvise in the family refrigerator. My aim was concentrated beef flavor with a more controlled home process.
Protection Matters, but No Appliance Makes Dry Aging Risk-Free
A dry-aging bag provides a membrane between the beef and its surroundings while allowing moisture to escape. That makes proper bag selection, sealing, handling, and placement important. A puncture or a problem with the setup can undermine the process.
The Reserve 50 takes a different approach. Its UV feature is intended to inhibit unwanted microbial growth, alongside the appliance’s controlled environment. That extra layer of protection was a major part of its appeal to me.
UV treatment is not a guarantee that meat is pathogen-free. It does not replace sanitation, correct operating conditions, manufacturer instructions, or appropriate food-safety decisions.
That distinction matters particularly when discussing the pellicle, the dried exterior trimmed away before cutting steaks. The bag manufacturer’s customer-support guidance shown during this comparison did not recommend that trim for human consumption.
I was interested in saving trim from the dedicated fridge for future dry-aged burgers. However, the presence of UV alone is not enough to establish that pellicle is safe to eat or grind. Do not treat all dry-aged trim as usable food, and follow product-specific safety guidance rather than assuming the appliance has made it safe.
The household-fridge complication
Our family refrigerator gets opened constantly. With young kids and people moving things around, I did not love the idea of an expensive roast sharing that busy environment for weeks.
The dedicated unit gave me a separate space. I kept it indoors, as intended, and used its lock to prevent curious hands from opening the door. That is not sterilization, but it does help keep the aging setup undisturbed.
There was also a concern with the bagged sample: I found a wet, slimy-looking spot underneath it, despite using a rack. Sarah saw it and opted out of the taste test. I trimmed the area and proceeded myself, but that personal decision should not be taken as a safe handling recommendation. Trimming a suspicious area is not proof that the remaining meat is safe.
For general warning signs, the USDA’s guidance on meat color and spoilage explains why color alone is not enough and why a sticky, tacky, or slimy surface can be concerning. This comparison is a report of my results, not a validated home dry-aging safety protocol.
Before Cooking: The Beef Already Looked Very Different
Once I opened and trimmed the roasts, I almost could not believe they had started as parts of the same strip loin.
The bagged roast was flatter and tougher to trim
The bag-aged beef had a pinker hue and a noticeably flatter, more compressed shape. Its exterior was dry and leathery. I had to get fairly aggressive with the knife to reach meat that felt pliable and resembled steak.
That trim was not an insignificant handful, either. There was a meaningful amount of material coming off the roast, although I did not measure a yield percentage.
The dedicated-fridge roast felt soft and pliable
The fridge-aged beef had a deeper, mahogany-red appearance and retained a fuller shape. Handling it reminded me of working with butter: soft, pliable, and increasingly yielding as I held it.
That was a striking contrast to the leathery bagged exterior. It also suggested that controlling moisture loss might matter just as much as achieving dry-aged flavor.
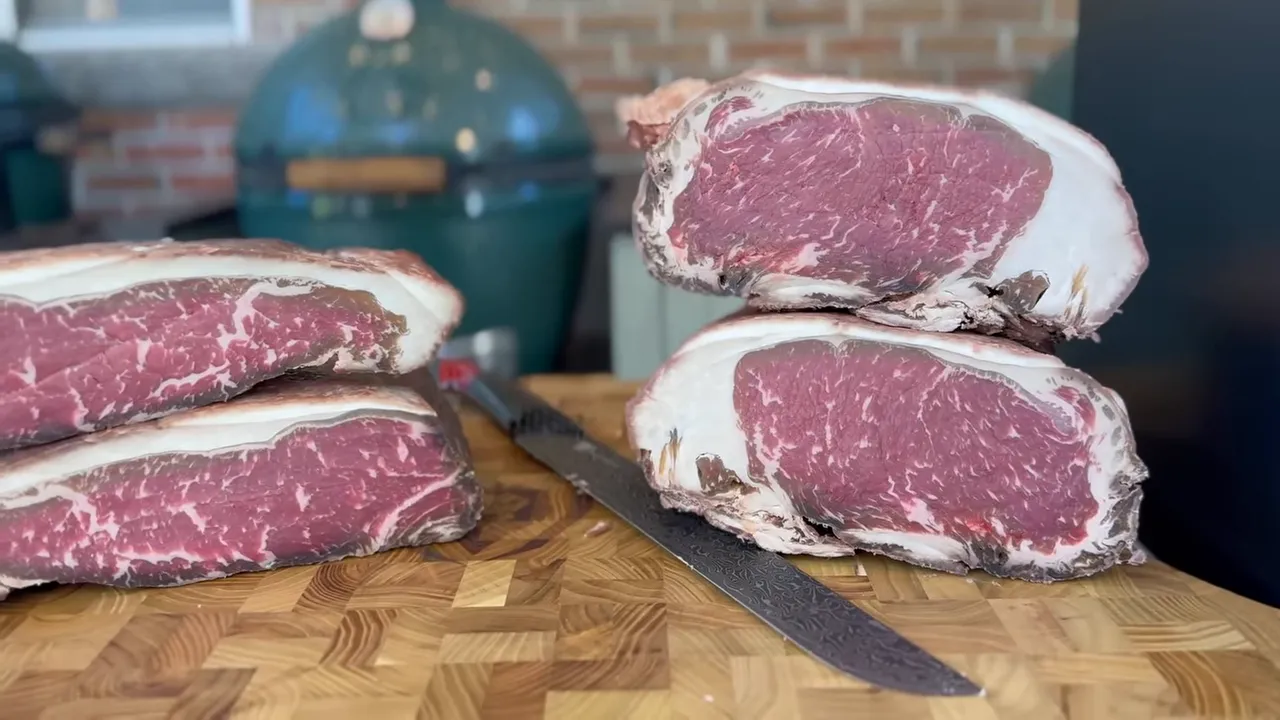
At that stage, humidity was still my hypothesis, not a proven explanation. I had not isolated every variable or measured moisture loss. The next question was the one I cared about most: would those physical differences carry through to the plate?
How I Cooked the Dry-Aged Steaks
I kept the seasoning simple: salt and pepper. I skipped my usual overnight salt brine because I wanted the aging methods, not an extra preparation step, to drive the comparison.
For the cook, I used my extra-large Big Green Egg and a reverse-sear approach.
- Start with a clean firebox. I removed the ash using my Kick Ash can and basket, added fresh charcoal, and lit it with a grill torch.
- Stabilize around 250°F. A half deflector plate created the indirect zone for the initial cooking stage.
- Track each steak separately. I assigned MEATER probe one to the fridge-aged steak and probe two to the bag-aged steak.
- Use an early temperature alert. I set the target around 114°F so I could remove the steaks before the high-heat finish.
- Rest while the grill heats up. Once the steaks came off, I opened the vents and brought the grill up for a brief, very hot sear.
Dry-aged steaks can cook surprisingly quickly. With moisture already removed during aging, I wanted a gentle first stage and enough warning to intervene before overshooting.
The 114°F setting was an intermediate pull target, not a final serving temperature or a food-safety recommendation. My aim was a medium-rare finish after searing, but I did not report a measured final internal temperature. For reference, federal safe minimum temperature guidance recommends 145°F for whole beef steaks followed by a three-minute rest.
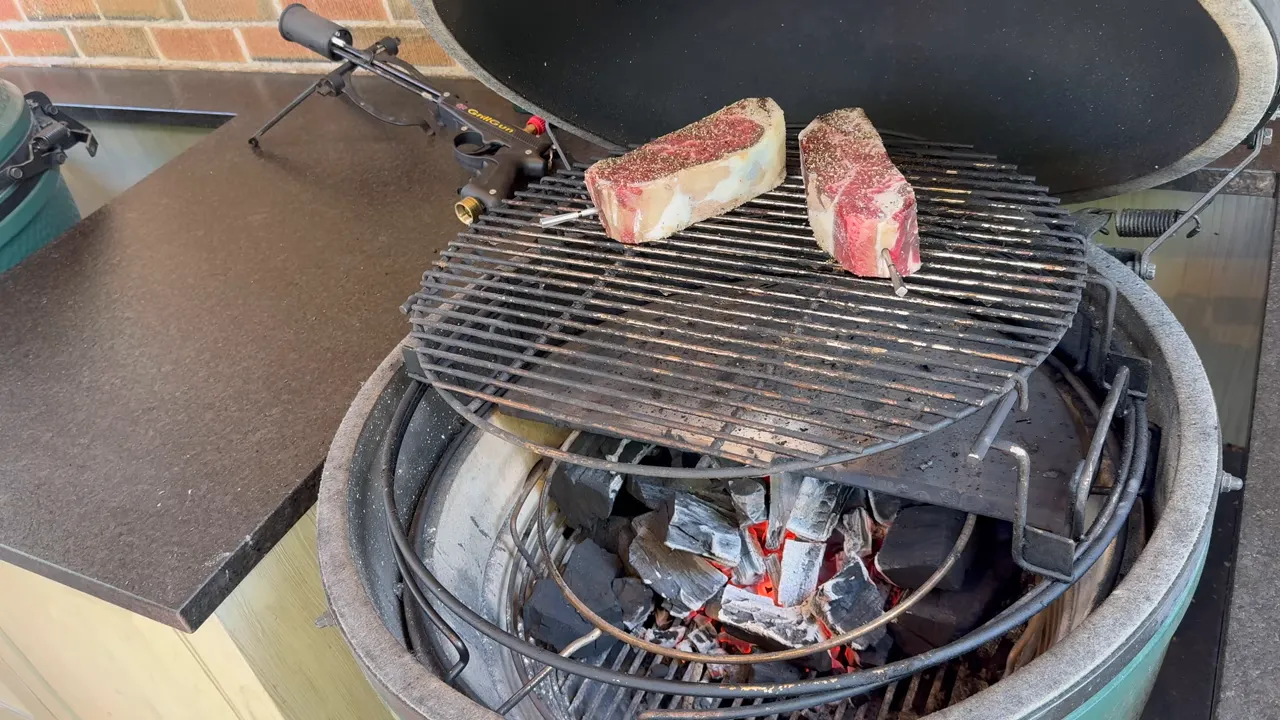
The practical cooking lesson is to give yourself room for the sear. Do not cook all the way to your intended finish during the indirect stage and then expect a blazing-hot finish to leave the interior unchanged.
The Taste Test: Dry-Aged Flavor Was Only Half the Story
I tasted the bag-aged steak first. The interior looked right for the medium-rare result I was after, but the chew was noticeably dry. There was dry-aged flavor, yet much less of the juicy steak experience I wanted.
Then I tried the fridge-aged steak.
Wow. The difference was not subtle.
I went back and forth to check my first impression. The dedicated-fridge steak delivered that deep, concentrated beefiness, but it was still juicy, tender, and almost melting in the mouth. The flavor spread across the tongue instead of arriving with a leathery chew.
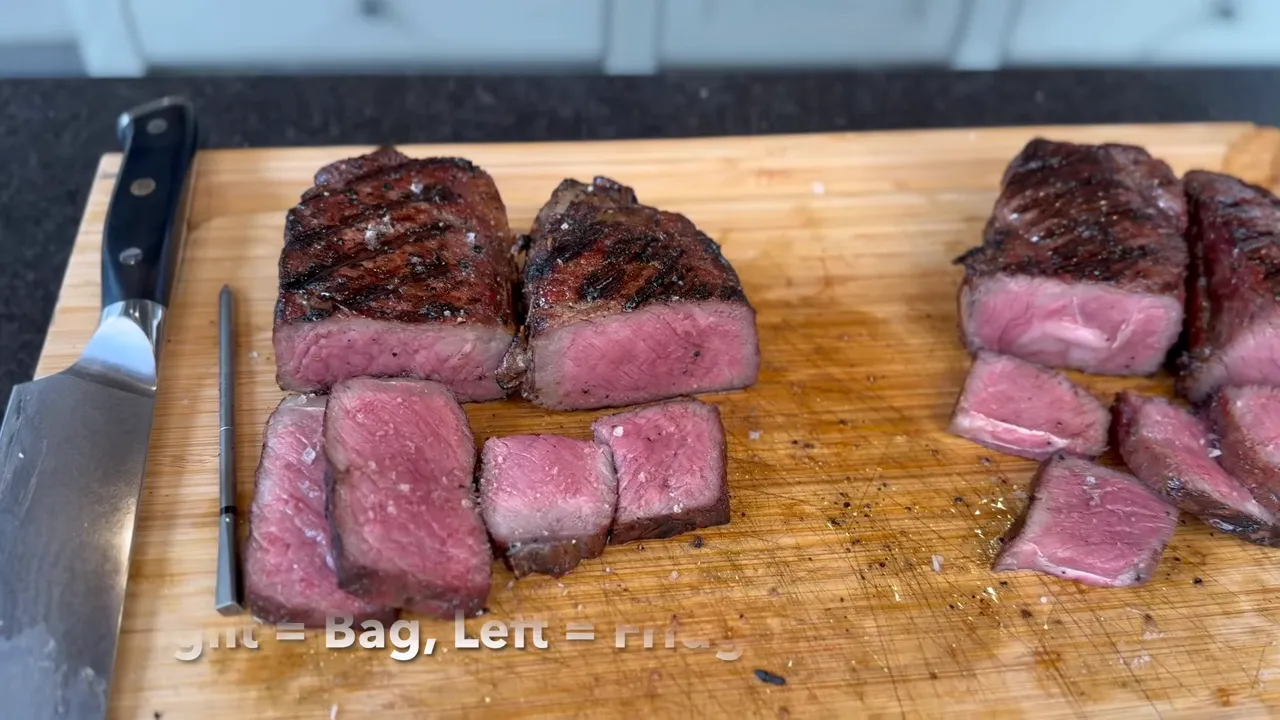
- Bag-aged steak: Concentrated flavor, but a substantially drier texture that reminded me more of jerky than I wanted.
- Fridge-aged steak: Deep beef flavor with a juicy, tender texture that made the wait worthwhile.
The important distinction is that both developed flavor. Only one gave me the combination of flavor and texture I was hoping for.
This was one comparison, judged by me, not a blind tasting panel or a series of repeated trials. It does not prove that every dry-aging bag will produce a dry steak. It does make my preference in this particular setup very clear.
Is a Dedicated Dry-Aging Fridge Worth It?
For me, absolutely. Two thumbs up.
That is not because I expect it to pay for itself quickly through savings on bags. At the bag prices I was considering, I would need years of consecutive aging to reach a simple break-even point.
My reasons are different:
- Control: A dedicated environment lets me manage humidity as well as temperature.
- Consistency: I want a repeatable result when I commit an expensive roast to weeks of aging.
- Separation: The beef does not have to share space with the daily traffic in our family refrigerator.
- Eating quality: In this test, the improvement in tenderness and juiciness was dramatic.
Bags have an obvious advantage in upfront cost. If that is the main consideration, they are the less expensive entry point. But this comparison convinced me that a dedicated fridge buys more than convenience. It can change the steak on the plate.
My goal was never simply to remove water from beef. It was to make a steak with bigger flavor that I still loved eating. The dedicated fridge delivered exactly that.
Thanks to Dalstrong for sponsoring this comparison. Their knives are my go-to for sharpness, reliability, and the way they feel in use.
|


