A holiday roast should look like a million bucks, taste fantastic, and leave you free to enjoy dinner with your family. It should not have you hovering over the grill while everyone inside wonders when they are going to eat.
This braided beef tenderloin checks those boxes with a caveman sear, a mustard and horseradish coating, an optional mushroom and roasted chestnut duxelles crust, and a little aromatic herb smoke. Better still, the braid creates different thicknesses that cook to different levels of doneness, giving you more variety from one roast.
I am normally a ribeye guy. But when the rib roasts I was considering cost nearly twice as much as the tenderloin, a change of holiday plans made sense. Tenderloin can be a little quiet in the flavor department. With these upgrades, quiet is not a problem.
What You'll Learn
- Braiding creates different thicknesses, allowing one tenderloin to produce a range of doneness.
- Dry brine overnight, then use a salt-free rub to avoid overwhelming the thinner strands.
- Sear directly on hot coals before finishing indirectly at 250°F with optional mushroom duxelles.
- Use gentle herb smoke and check multiple temperatures to preserve flavor balance and control the finish.
Table of Contents
- Why Braid a Beef Tenderloin?
- Start the Day Before With a Dry Brine
- Build a Small, Hot Fire Without Overheating the Kamado
- Mix the Salt-Free Tenderloin Rub
- Cut, Season, and Braid the Tenderloin
- Caveman Sear for Char and Texture
- Brush On the Mustard and Horseradish Coating
- Make the Optional Mushroom and Chestnut Duxelles
- Coat the Roast and Cook at 250°F Indirect
- Add Holiday Aroma With an Herb Smoke Bomb
- Finish by Temperature, Then Rest and Slice
- The Result: Tenderloin With Real Holiday Flavor
- A Note on Temperature Tools
Why Braid a Beef Tenderloin?
My preferred steak doneness is medium rare. I sometimes struggle to understand why there are other options, but apparently the entire dinner table does not share that opinion.
That is where this method earns its keep. Instead of trying to make the whole tenderloin perfectly uniform, we use its natural taper and a three-strand braid to create thicker and thinner sections. The smaller sections cook further while the larger portions stay pinker.
The goal is deliberately varied doneness, not identical doneness from end to end. On this cook, a cross-section closer to the thinner end included portions ranging from medium rare through medium to well done.
The braid also gives us more surfaces to season before assembling the roast, plus a presentation that feels right at home on a Christmas dinner board. Add a deeply flavored crust, and tenderloin becomes a holiday centerpiece rather than just a tender piece of beef.
Start the Day Before With a Dry Brine
Salt the whole beef tenderloin the day before and refrigerate it overnight. I used Diamond Crystal kosher salt for this dry brine.
This is the main salting step for the beef. The seasoning rub that follows contains no added salt, and that distinction matters. Once the tenderloin is cut into strands, the thinner portions have a lot of seasoned surface relative to the amount of meat. A salty rub can quickly overwhelm those bites.
Dry brining first, then using a salt-free rub, gives us better control. Anyone who wants a little extra pop can add finishing salt at the table.
Build a Small, Hot Fire Without Overheating the Kamado
I cooked this roast on an extra-large Big Green Egg, starting with a small, intensely hot coal bed for the sear.
- Shake the loose ash out of the charcoal basket and empty the ash can.
- Add fresh lump charcoal and bank the coals toward the back, much as you would for a rotisserie cook.
- Light the charcoal and let that relatively small bed become fully active.
- Leave the dome open during this stage so you do not unnecessarily heat-soak the ceramic.
That last point makes the next stage much easier. We need fierce contact heat for searing, followed by an indirect cooking temperature of 250°F, about 121°C. If you heat-soak the whole kamado at searing temperatures, bringing it back down becomes a much bigger job.
Keeping the dome open limits that stored heat. After searing, fresh charcoal and the ceramic heat deflectors help bring the setup down toward our roasting temperature.
Mix the Salt-Free Tenderloin Rub
This is a modified version of my Ultimate Texas SPG seasoning, with the salt and seasoned salt left out. It brings pepper, garlic, a little heat, and some coarse texture to the beef.
- 6 tablespoons freshly cracked black pepper
- 1½ tablespoons paprika
- ½ tablespoon cayenne pepper
- 1 tablespoon granulated onion
- 1 tablespoon granulated garlic
- 2 tablespoons coarse garlic
- 2 tablespoons crushed red pepper flakes
Combine everything in a shaker and mix well. This makes a batch of rub, not a requirement to use every last bit on one tenderloin.
The coarse garlic is worth seeking out for its texture. There is already granulated garlic in the mix, but the larger pieces add something different to the crust.
Cut, Season, and Braid the Tenderloin
Set the dry-brined tenderloin on a cutting board and straighten it out. Make two lengthwise cuts to create three roughly equal strands, leaving them connected at one end so you have an anchor for the braid. Follow the shape of the meat rather than worrying about perfect measurements.
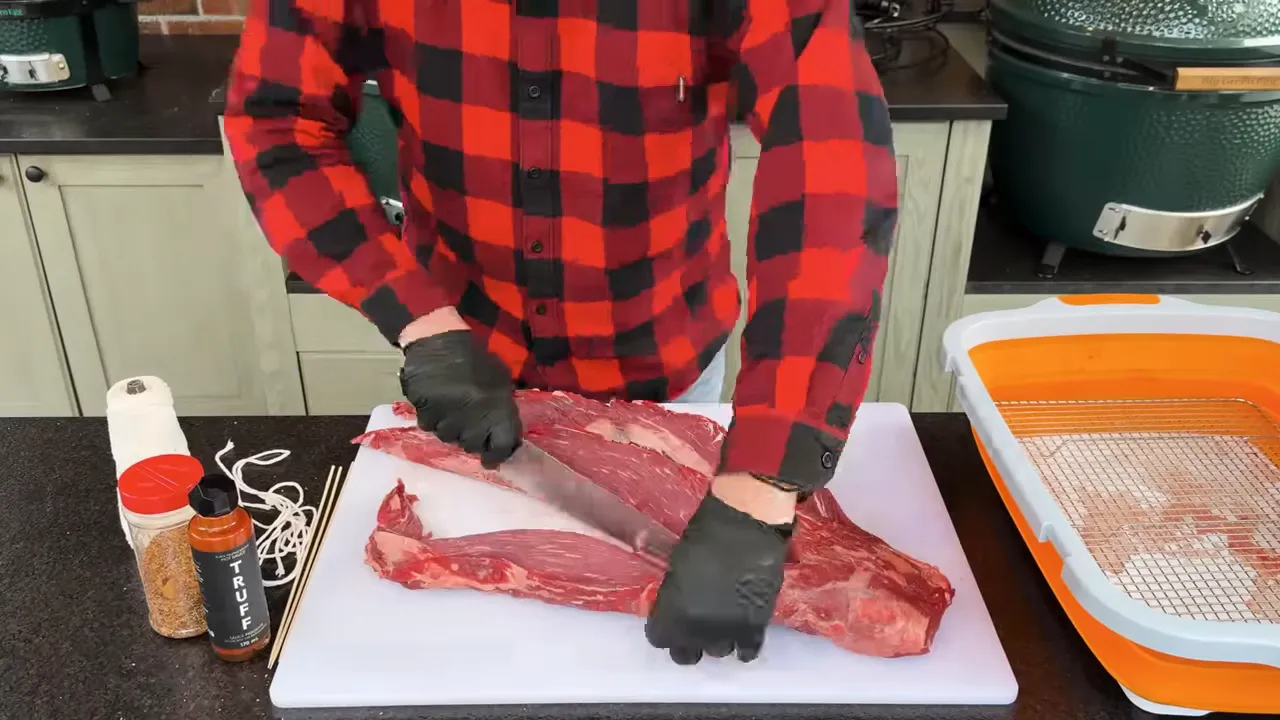
- Apply a thin binder. I used a few drops of truffle hot sauce, smeared over the meat. Truffle-infused olive oil or another binder also works. You do not need an expensive option.
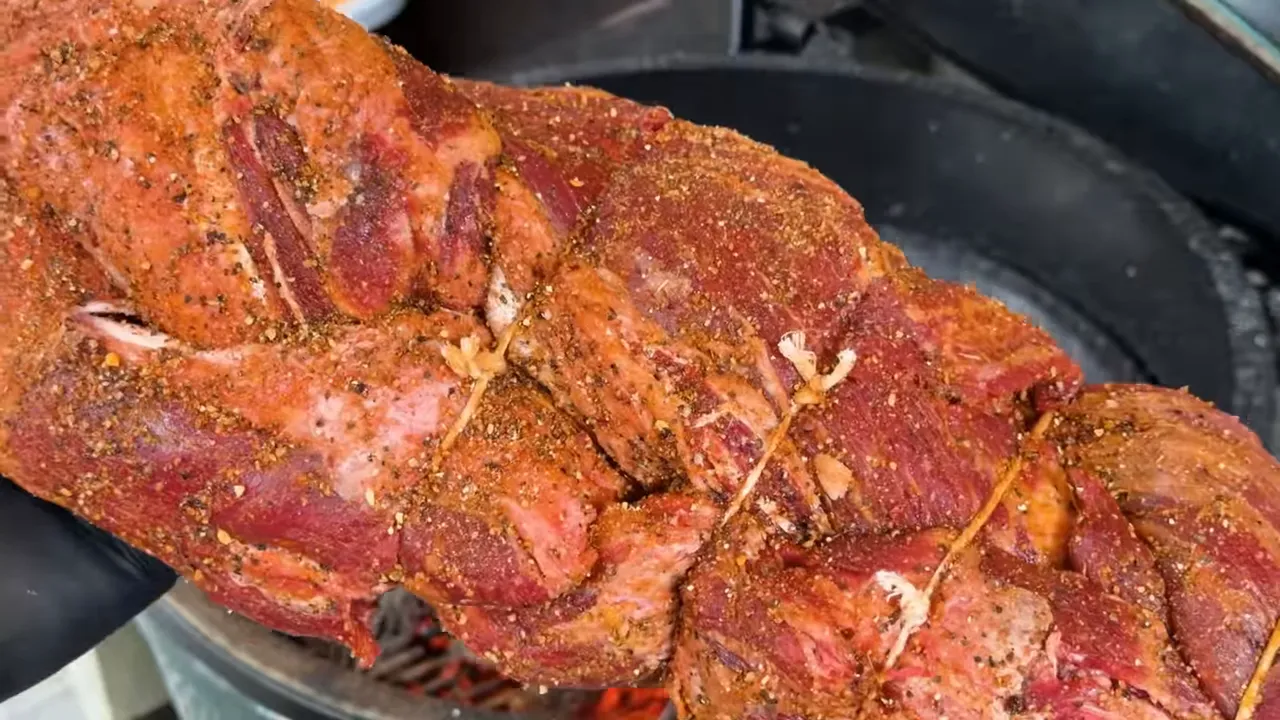
- Season the exposed surfaces. Apply the salt-free rub before braiding so the flavor gets between the strands, not just around the outside.
- Braid the strands. Alternately cross an outside strand over the middle, working toward the loose ends.
- Secure the shape. Tie the tail with butcher’s twine and add temporary support where needed for handling.
- Touch up the seasoning. Cover any bare spots created while braiding and tying.
I initially used wooden skewers for support, then switched to more twine before the direct-coal sear because exposed wooden supports can burn. The support is there to help move the roast, not to become part of dinner.
Caveman Sear for Char and Texture
A caveman sear means placing the beef directly on the hot coals. In my earlier four-way searing comparison, this method came out on top for flavor, so it is the first big flavor upgrade for this tenderloin.
Break down and spread the fully lit, white-ashed lump charcoal into a bed with enough surface area to support the roast. Place the braided tenderloin directly on it, then turn it to develop color on the different surfaces.
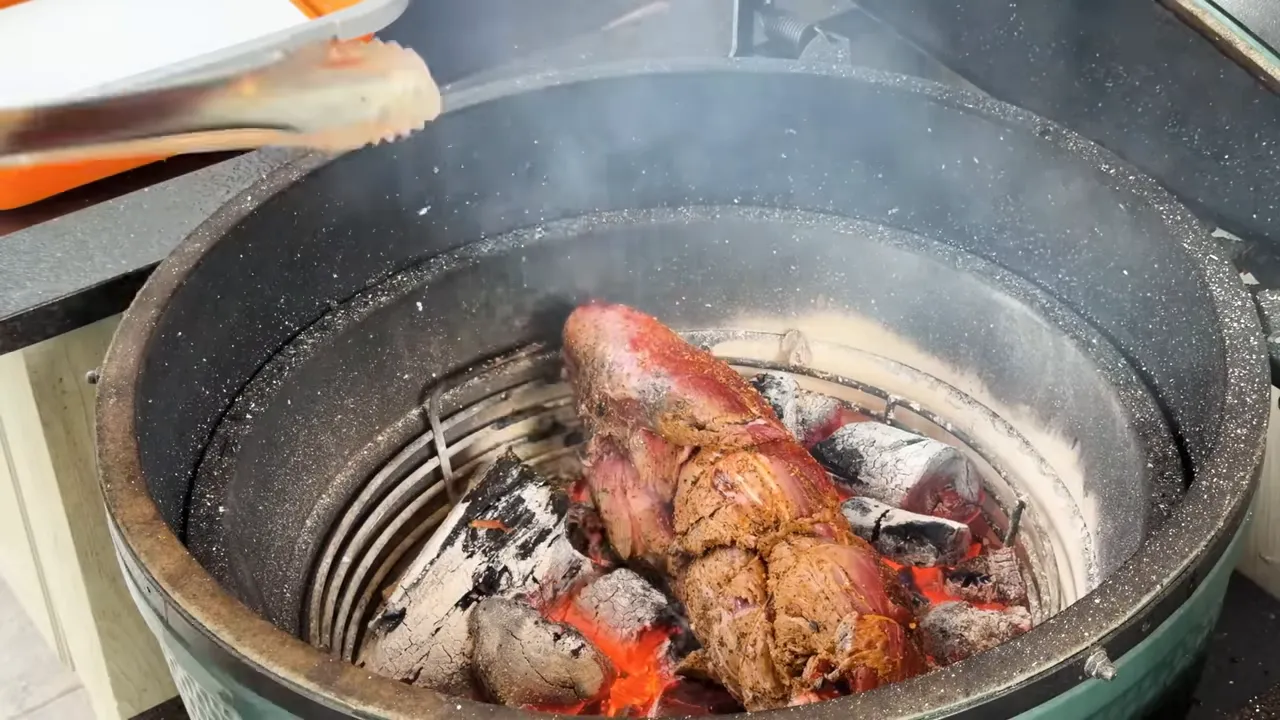
This stage is about the exterior, not cooking the center to its final temperature. Once the beef has good seared color, move it off the coals.
Reset the grill for indirect cooking
Cover the active coal bed with fresh lump charcoal, install the cooking rack system and ceramic heat deflectors, then close the dome and adjust the top and bottom vents.
Let the grill settle at 250°F while you work on the next flavor layers. The fresh charcoal and deflectors help reduce the immediate heat reaching the cooking area, while the open-dome start means there is less stored heat to fight.
Brush On the Mustard and Horseradish Coating
Mix together:
- 2 tablespoons whole-grain mustard
- 2 tablespoons horseradish
Brush the mixture over all sides of the tenderloin while the beef is still warm from searing.
This adds another layer of flavor and gives the mushroom duxelles something to cling to. The mustard and horseradish should contribute to the finished roast without taking over every bite.
Make the Optional Mushroom and Chestnut Duxelles
The duxelles is optional. If you are short on time or do not like mushrooms, skip it. The braided tenderloin is still excellent without it.
I happen to be a fungi guy, so I am going all in. Mushrooms, roasted chestnuts, garlic, shallots, and thyme bring the seasonal flavors that make this roast feel especially festive.
Duxelles ingredients
- About 700 grams, or 1½ pounds, mushrooms
- 3 shallots
- 5 garlic cloves
- A handful of roasted chestnuts
- Fresh thyme
- A little water, only as needed to help the processor combine everything
- About 2 tablespoons butter
- Salt and freshly cracked black pepper, to taste
Cremini mushrooms work well on their own. For this cook, I used half cremini and half shiitake.
Process, cook down, and cool
- Remove the mushroom stems and add the mushrooms to a food processor, working in batches if needed.
- Finely chop the shallots and garlic and add them to the mushrooms.
- Add the roasted chestnuts and thyme, then process everything into a fine paste.
- Use only enough water to help the mixture incorporate. That added moisture will need to cook off.
- Melt the butter in a pan, add the paste, and cook gently over low heat, stirring and seasoning with salt and pepper.
- Continue cooking until the excess moisture has evaporated and the mixture is thick rather than wet.
- Spread it in a shallow foil pan to cool before applying it to the beef.
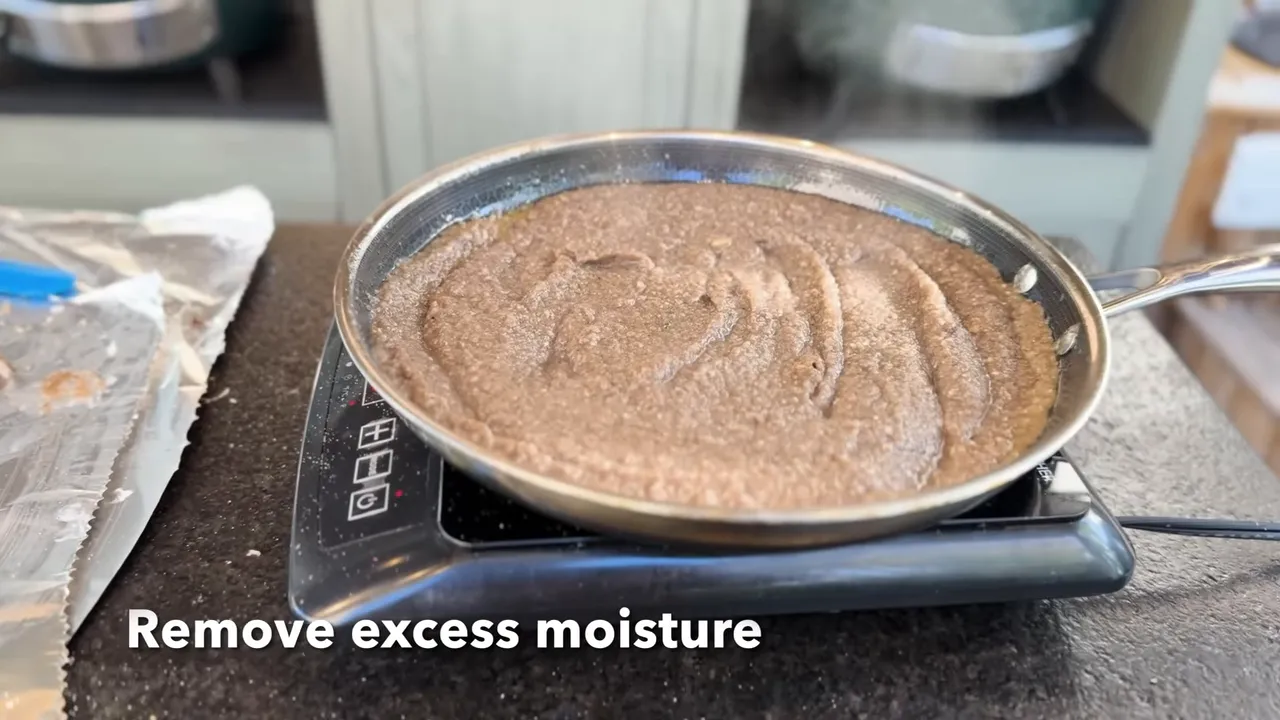
The bubbling slows as the moisture cooks away. That is the cue I am looking for, along with the thickened texture.
I used smoked flaky sea salt in the duxelles and kept some for finishing at the table. Remember that the beef is already dry-brined, so season this component thoughtfully.
A shallow pan helps the paste cool quickly. I briefly put mine in the freezer so it was no longer scorching hot when it was time to handle it.
Coat the Roast and Cook at 250°F Indirect
Apply the cooled duxelles generously to the top, bottom, and sides of the tenderloin. Move the roast to the raised cooking grate over the heat deflectors and touch up any areas disturbed during the transfer.
Remove the temporary twine supports once the roast is positioned and supported on the grate, then smooth the coating. Remove any remaining supports before serving.
Install temperature probes at both ends of the roast. Tracking more than one location is particularly useful here because different sections are supposed to cook differently.
Use an instant-read thermometer to spot-check other portions as the cook progresses. On this cook, the leave-in readings were around 114°F to 115°F when a spot check showed about 117°F. That is a good reminder not to rely on one reading from one location.
Add Holiday Aroma With an Herb Smoke Bomb
I generally avoid heavy wood smoke on mild cuts such as beef tenderloin and on holiday turkey. It can easily bury the other flavors we have worked to build.
Instead, bundle together rosemary, sage, and thyme with cooking twine. This is what I call an herb smoke bomb.
You can add the bundle directly to the fire. On my Big Green Egg setup, I placed it in the ash-can area beneath the charcoal basket, where falling hot embers could make it smolder. Close the lower vent back to its cooking position afterward.
This gives the roast a gentle aromatic smoke character. It is also a way to bring those herb flavors into the cook without relying on delicate herbs sitting on the exterior, where they can burn.
Finish by Temperature, Then Rest and Slice
My target finishing temperature for the larger portions was about 130°F, roughly 54°C, with the thinner braided sections cooking further.
As the roast approached the finish, I opened the top and bottom vents a little more to raise the heat. With the beef sitting higher in the dome, the stored heat in the ceramic gave the exterior something like a broiler finish, helping develop texture in the duxelles crust.
Keep checking multiple locations rather than chasing a fixed cooking time. The roast’s size, strand thickness, and grill behavior all affect when it is ready.
Food safety note: My 130°F target reflects a medium-rare preference, not the USDA’s recommended safe minimum. The USDA guidance for beef steaks and roasts is 145°F followed by at least a three-minute rest. Do not use color alone to verify that a portion has reached a safe temperature.
Transfer the finished roast to a board and let it rest before slicing. Start closer to the thinner end if you want to see the greatest variety of doneness.
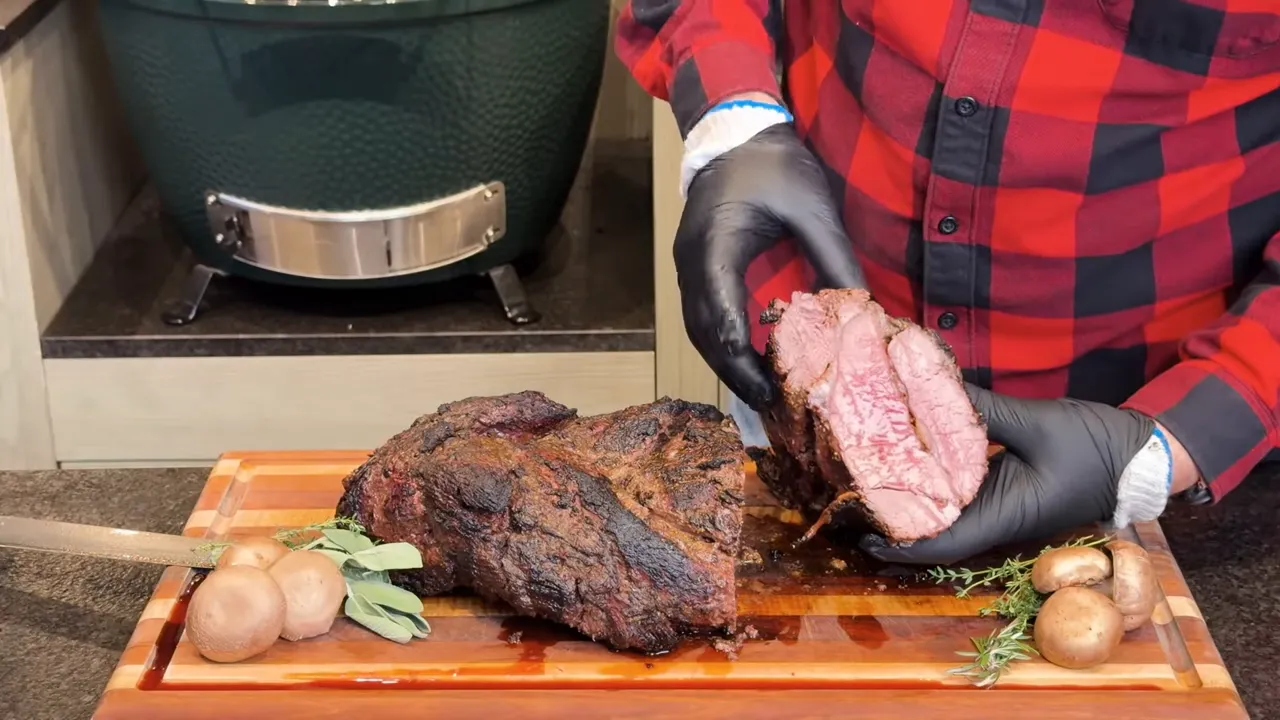
Offer finishing salt separately. A small sprinkle gave my portion another lift, but keeping it at the table lets everyone choose their own level.
The Result: Tenderloin With Real Holiday Flavor
This became my favorite beef tenderloin for a reason. The caveman sear brings char. The pepper and garlic bring texture. The mushroom and chestnut crust adds seasonal richness, while mustard, horseradish, and aromatic herb smoke round everything out.
The important part is balance. The first impression should not be salt, smoke, pepper, or horseradish on its own. It should be a tender bite of beef with all those flavors working together.
We also got the variety we set out to create: pinker portions for the medium-rare crowd and more thoroughly cooked pieces for those who prefer them. One roast, a beautiful presentation, and less fuss over individual steaks. That is a holiday cook I am happy to repeat.
A Note on Temperature Tools
ChefsTemp sponsored this cook. I became a customer after testing the X10 instant-read thermometer, and I continue to use it for spot checks like the ones described here.
For anyone wanting more automation, the ProTemp S1 smart gauge can work with up to four independent probes and the optional Breezo fan to manage the fire on compatible analog grills and smokers. That is a separate upgrade from the basic temperature monitoring this recipe needs, but it can free up more time for friends and family.
|


