When you buy a bone-in pork shoulder, part of what lands on the scale is something you are not going to eat. Does leaving that bone in give you better pulled pork, or are you better off putting your money toward more meat?
I put two closely matched Boston butts through the same seasoning, smoke, cook, and overnight hot hold to find out. One had the bone intact. The butcher deboned the other.
The bone-in shoulder won our taste test, but this was a close finish, not a blowout. Both made excellent pulled pork. The more useful story is how we cooked them, what we could actually taste, and whether that small difference should change what you buy.
Table of Contents
- Key Takeaways
- Setting Up a Fair Bone-In vs. Boneless Test
- Give Large Pork Shoulders Time to Dry Brine
- My Tex-Mex Dry Rub Recipe
- Test-Fit the Pork Before Lighting the Grill
- Start With a Small Live-Wood Fire
- Good White Smoke vs. Bad White Smoke
- Transition to Double-Indirect Hot Smoking
- Manage the Surface Without Constantly Opening the Dome
- Use an Overnight Hot Hold to Take the Pressure Off Dinner
- The Blind Taste Test: Which Pork Shoulder Was Better?
- Is Bone-In Pork Shoulder Worth Buying?
Key Takeaways
- Bone-in pork shoulder earned a slight preference for juiciness and flavor in our side-by-side taste test.
- Both shoulders shredded beautifully after identical seasoning, shared smoke, and a 17-hour hot hold.
- Clean combustion and protection from burning drippings were priorities throughout the kamado cook.
- An overnight hot hold made serving time more predictable and the finishing process more forgiving.
Setting Up a Fair Bone-In vs. Boneless Test
I asked my butcher for two pork shoulders as close as possible in size and weight. The goal was to change the bone, not the entire cook.
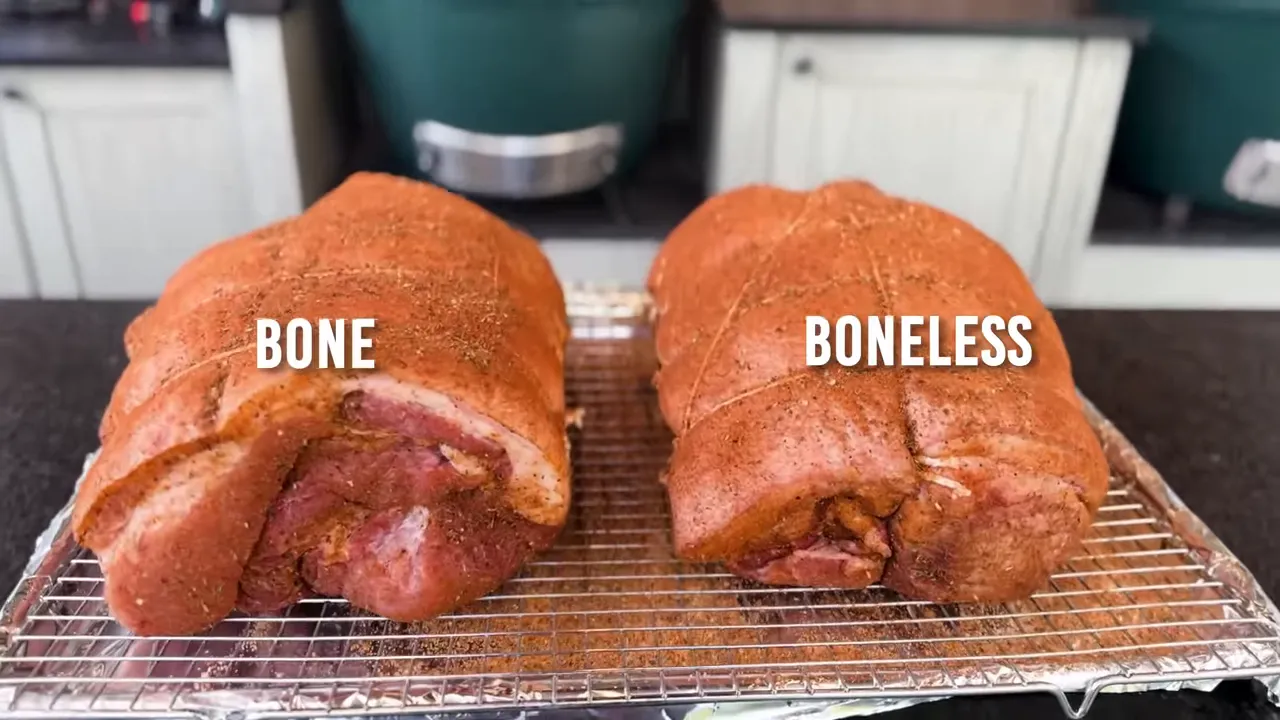
Both shoulders received the same Tex-Mex dry rub and spent 48 hours uncovered in the refrigerator. Then they went onto the same extra-large Big Green Egg, with the same smoking wood and the same double-indirect setup.
Using one grill mattered. Even with a second Egg available, separate fires would introduce differences in airflow, wood consumption, and fire management. I wanted the comparison to be about the pork, not which grill happened to have the better day.
This was also a working cook, not just an experiment. The pulled pork was the last piece of a carnitas-style wedding menu for my niece, alongside about 30 pounds of carne asada and another 25 to 30 pounds of pulled chicken. The same Tex-Mex seasoning tied the menu together.
One important limit: this was a backyard comparison of two roasts, with Sarah tasting blind and me knowing which was which. It tells us what we preferred in this cook. It does not prove that every bone-in shoulder will beat every boneless one.
Give Large Pork Shoulders Time to Dry Brine
For thinner cuts, such as steaks or pork tenderloin, an overnight dry brine is usually plenty for my approach. These were much larger roasts, so I gave the salted rub 48 hours to work.
Both shoulders also had the rind attached. That made the uncovered refrigerator time especially useful. Along with seasoning the meat, I wanted to dry the skin enough to give it a chance of developing some crackling.
The target was a pulled-pork mixture with tender meat, rendered fat, and a few crunchy, almost bacon-like pieces. Dry skin gives you a better starting point for crispness than a damp surface.
That does not mean every bit of rind will become perfect crackling during a long smoke and foil hold. It was the texture I was aiming for, and it influenced both the preparation and the decision to cook high in the dome.
My Tex-Mex Dry Rub Recipe
The flavor inspiration here was Meat Church Holy Voodoo, but this is a copycat-ish blend, not an exact duplicate. My version skips the MSG, turbinado sugar, and dehydrated jalapeño powder, using less expensive pantry ingredients and a little less sugar.
This makes a large batch, close to enough for a large seasoning bottle. Cut it in half if you are filling a smaller shaker.
- 1 cup Diamond Crystal kosher salt
- 10 tablespoons smoked paprika
- 6 tablespoons granulated garlic
- 6 tablespoons brown sugar
- 3 tablespoons freshly cracked black pepper
- 2 tablespoons dried oregano
- 1 tablespoon granulated onion
- 2 teaspoons chili powder
- 2 teaspoons cayenne pepper
- 2 teaspoons cumin
- 2 teaspoons celery seed
Combine everything and shake thoroughly until the ingredients are evenly distributed. Use granulated garlic and onion rather than the very fine powders for the texture of this blend.
The cup of salt is specifically Diamond Crystal kosher salt. Keep that ingredient specification in mind rather than treating every salt as interchangeable by volume. This is also a batch recipe, not an instruction to apply the entire bottle to two shoulders.
Test-Fit the Pork Before Lighting the Grill
Two massive pork butts on an elevated rack can turn a familiar setup into a clearance puzzle. The time to solve that puzzle is before the ceramics are hot.
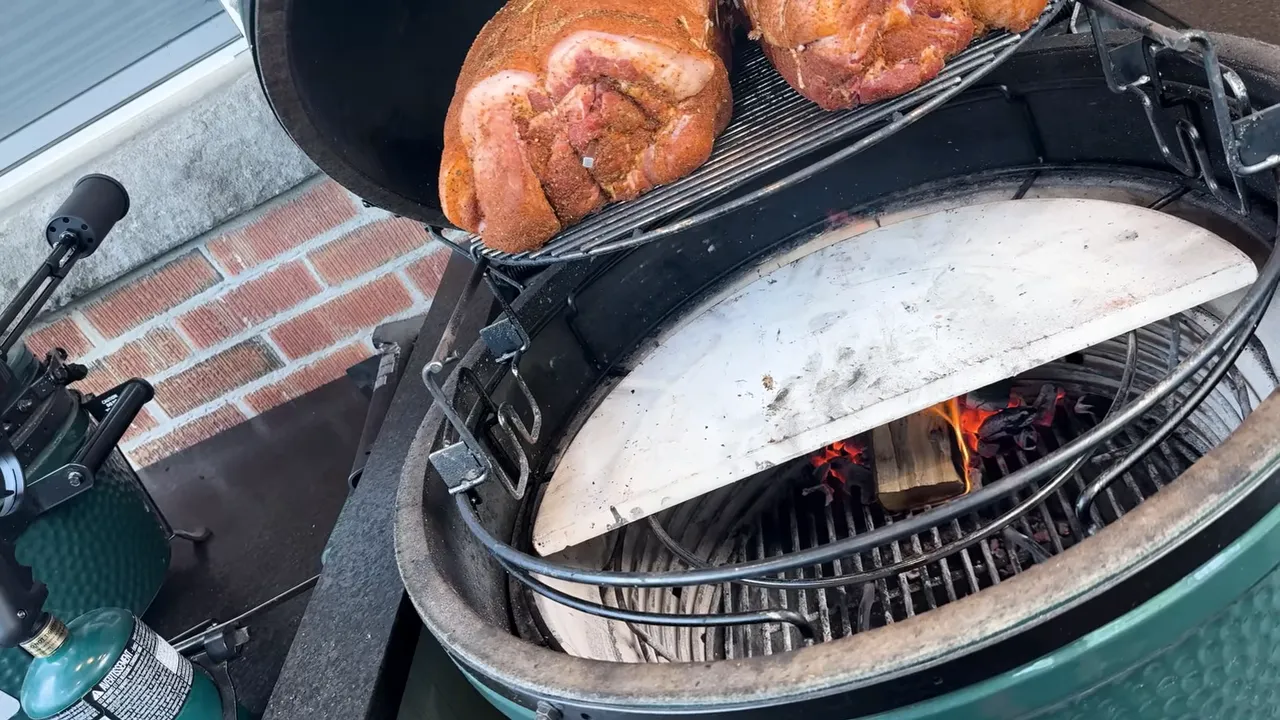
I put both shoulders on the upper rack and checked that the dome would close without the meat touching it. They fit, but there was a compromise underneath.
With one roast, I could position the meat directly above a deflector and protect it completely. With two, the front of the fire area was exposed. My solution was a second, movable deflector to shield that opening.
When it was time to add wood, I could use high-heat gloves to slide the front stone aside, add the split, and replace the protection. A little extra work, yes, but still manageable for a short opening smoke phase.
Why I Wanted the Shoulders High in the Dome
My testing, including airflow modeling, has pushed me toward cooking large cuts higher in the kamado dome. That position takes advantage of the smoke movement, convection, and radiant heat available up there.
For skin-on pork shoulders, that was especially attractive. I wanted smoke on the meat and enough heat activity around the rind to encourage those crisp edges.
Start With a Small Live-Wood Fire
The first stage used a small handful of charcoal and naturally seasoned wood splits. I call this my cold-smoke phase, although the grill was running around 160°F to 180°F, not at traditional cold-smoking temperatures.
That distinction matters: this was a brief opening stage followed immediately by hot cooking, not a method for preserving raw pork with cool smoke.
Here is how I set up the fire:
- Start with a cold kamado and a small handful of charcoal.
- Light the charcoal until it is well established and ashed over.
- Add a wood split and confirm that it catches with visible flame.
- Position the rear deflector to block flames from coming up behind the pork.
- Prewarm the next split near the fire, without adding it to the active burn yet.
- Install the front deflector to protect the shoulders.
I used naturally seasoned wood because I prefer the flavor it gives me in this setup. The wood I described was around 11% to 12% moisture content, compared with some very dry retail wood around 0% to 5%. The practical point is that wood condition affects how readily it lights and how it burns.
Vent Settings for the Opening Smoke Phase
I left the top regulator fully open for draw and restricted the bottom draft door to roughly a pinky's width. With a small coal bed and one active split at a time, that gave me enough airflow for combustion without letting the fire run away.
I expected a split to last about 30 to 45 minutes and planned on tending the fire several times over a maximum of two hours. In practice, this cook was easier than expected: I only needed to replenish the wood once to get through the two-hour phase.
The grill stayed below 200°F, mostly in that 160°F to 180°F range, while the shoulders started taking on smoke and color.
For a conventional smoking approach, the USDA's smoking guidance recommends maintaining the smoker between 225°F and 300°F. The lower-temperature opening stage here is a specific experimental technique, not the standard food-safety recommendation.
Good White Smoke vs. Bad White Smoke
Smoke color alone does not tell the whole story. In this setup, I could see white smoke while the wood was actively burning with an open flame. That is different from loading the firebox with wood and choking it into a smolder.
I look at the combustion and pay attention to the aroma, not just the color coming out of the cap.
- What I want: actively burning wood and a sweet, pleasant wood-fire aroma.
- What I avoid: heavy, billowing smoke with an unpleasant wet-wood smell, or greasy smoke from burning drippings.
Assess the aroma from a safe distance rather than putting your face over the exhaust. A pleasant smell is a flavor cue, not a substitute for safe temperature control.
Why This Works Best Before the Kamado Is Heat-Soaked
The timing is the important part. At the beginning, the cold ceramic body absorbs energy as the fire burns. That gives me room to run a live wood flame while the grill gradually warms.
Once the Egg is fully heat-soaked, it needs very little fuel to hold temperature. Adding a burning split at that point creates a problem: either the temperature climbs, or I restrict the airflow enough to make the wood smolder.
That is why I use this method at the beginning, not as a late-cook rescue mission for more smoke.
The other common mistake is simply adding too much wood. Start small. A clean-burning split is the goal, not a basket full of wood struggling for oxygen.
Transition to Double-Indirect Hot Smoking
After two hours, I switched from tending the wood fire to a charcoal-driven hot cook.
I recommend temporarily removing the pork during this changeover. That keeps the meat away from the startup smoke while fresh charcoal gets established.
- Lift out the elevated rack and set the shoulders aside safely.
- Place the remaining wood at the bottom and add fresh charcoal.
- Light the charcoal thoroughly and allow the fire to settle.
- Reinstall the lower deflectors.
- Add suitable heat-safe spacers and a second ceramic barrier, leaving an air gap.
- Install a raised drip pan, then return the pork to the upper rack.
The double-indirect arrangement adds another barrier between the fire and the food. My aim is to reduce aggressive bottom heat while making an efficient ceramic cooker work a little harder to maintain cooking temperature. In my experience, that helps me get the fire behavior and flavor I want.
Leave an Air Gap Under the Drip Pan
Two shoulders render a lot of fat. I used a drip pan with small feet so it did not sit directly on the ceramic beneath it.
That separation matters because catching fat is only half the job. If it burns in the pan, those unpleasant aromas can rise straight back toward the pork.
The lower heat barriers and raised pan worked together to protect the meat and keep the drippings from becoming another unwanted smoke source.
The Clearance Lesson I Would Carry Into the Next Cook
The convEGGtor's raised legs used more vertical space than I had allowed for. With lower deflectors already installed, fitting the elevated rack back over the front was awkward.
If I were setting this up again with everything cold, I would consider a flatter pizza stone as the upper barrier. Another option is flipping the convEGGtor legs down where the surrounding setup allows it. The point is to check the complete stack, not just whether the pork fits under the lid.
My grill-specific digital guides cover vent settings, smoking wood, and alternative double-indirect arrangements for Big Green Egg, Primo, and Kamado Joe cookers.
|
Manage the Surface Without Constantly Opening the Dome
Once the hot-smoking setup was in place, I wanted to leave the grill alone as much as possible.
With a charcoal basket, I can add small slivers of smoking wood through the ash area, where falling hot embers help ignite them. That lets me add some smoke without dismantling the cooking setup.
If the meat showed signs of drying excessively, my spritz was a half-and-half mixture of apple cider vinegar and water. I was not looking to keep the whole surface wet. With the fat cap and rind protecting the meat, a few crisp bits were welcome.
The main jobs were steady cooking, protecting the underside, and keeping rendered fat from burning.
Use an Overnight Hot Hold to Take the Pressure Off Dinner
After just over 12 hours on the Big Green Egg, the shoulders were around 195°F internally. Instead of chasing the final moment of tenderness on the grill, I took them off for an overnight hot hold.
This is one of the most useful changes I have borrowed from Texas barbecue practice. It solves two very practical backyard problems.
1. Dinner Stops Depending on the Stall
A 12-hour cook, followed by a rest, can mean a painfully early start if you want dinner ready at 6 p.m. And that assumes the shoulder follows your schedule. Pork does not own a calendar.
Cooking ahead and holding hot means the meal is ready before the guests arrive. You are no longer standing beside the grill wondering whether the stall will end in time.
2. The Finishing Window Gets More Forgiving
Learning exactly what probe-tender feels like takes practice. Removing these shoulders around 195°F and letting the hot hold finish the process gave me a more forgiving approach than trying to nail the perfect endpoint over the fire.
That temperature is part of this cook-and-hold method. It is not a promise that every shoulder will be ready to shred straight off the grill at 195°F.
Rest Before Wrapping for the Hold
I let the shoulders sit unwrapped for about 30 to 40 minutes before wrapping them in foil. The purpose was to let some heat escape rather than trapping all that energy immediately and risking an overshoot during the hold.
Then I wrapped with the foil seams facing upward to retain as much juice and rendered pork fat as possible.
My oven normally bottoms out at 170°F, but its settings allowed an adjustment down to 150°F. Check your own manual rather than assuming every oven has the same capability.
Verify the actual holding temperature with a thermometer. For home hot holding, keep the food at 140°F or above, consistent with USDA hot-food safety guidance. A long hold needs dependable temperature control, not just a reassuring number on the oven display.
These shoulders stayed in the hot hold for 17 hours before shredding.
The Blind Taste Test: Which Pork Shoulder Was Better?
When I opened the foil, I poured the retained juices and rendered fat back into the pork. That is flavor and moisture worth keeping.
I removed the butcher's string from the boneless shoulder so Sarah would not have an obvious clue. The bone-in shoulder gave us a clean, easy bone pull, and both roasts shredded beautifully.
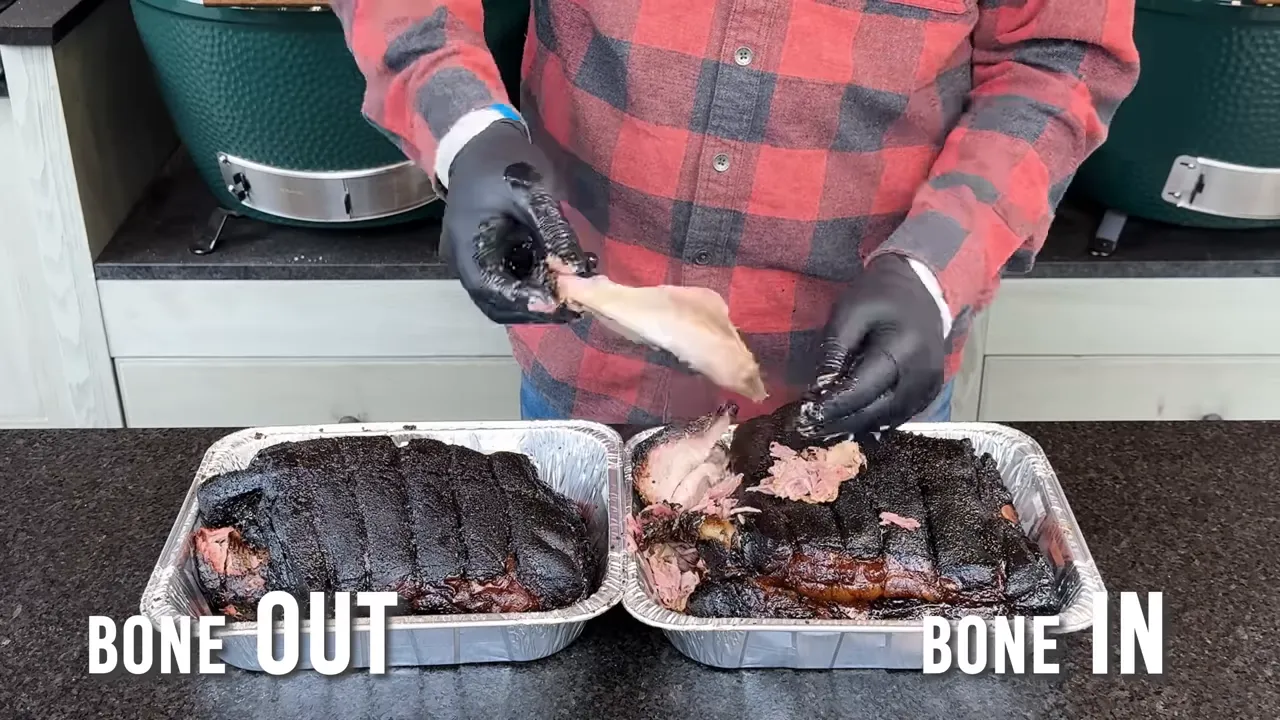
We tasted the pork without sauce. We also went back for additional bites and paid attention to matching the samples fairly, rather than comparing a bark-heavy bite from one pan with plain interior meat from the other.
Sarah's first impression was that both were delicious and extremely similar. Still, she kept returning to one pan. I preferred that same pan.
It was the bone-in shoulder.
What We Noticed
- Flavor: Both were excellent, but the bone-in pork had a small edge that was difficult to describe precisely.
- Juiciness: I found a little more liquid in the bone-in foil package and preferred its juiciness.
- Texture: Both shoulders pulled easily and produced a great shred.
- Cooking time: The bone-in shoulder finished roughly 15 minutes behind the boneless one.
- Interior seasoning: Neither of us noticed a meaningful advantage from the extra seasoning access in the deboned roast.
When we tried to put a number on the difference, Sarah described it as roughly a 5% preference. That was a casual way of saying “noticeable, but close,” not a measured increase in moisture or flavor.
The slight cooking-time difference could have involved the bone's effect on heat movement, but this test did not establish why it happened. Likewise, our preference does not demonstrate that flavor migrated from the bone into the meat. We tasted a difference; we did not isolate its mechanism.
Is Bone-In Pork Shoulder Worth Buying?
Given two comparable shoulders, I would choose bone-in after this cook. Sarah would too. The small advantage in juiciness and overall eating quality was enough to earn our preference.
But I would not hesitate to buy a boneless shoulder at a great price. This was splitting hairs between two very good pans of pulled pork.
The value question also needs more than a label. A bone contributes to the purchase weight, but this cook did not measure edible yield or calculate cost per pound of finished pulled pork. It was a taste comparison, not a complete cost analysis.
My practical verdict is simple: bone-in gets my vote when the choices are otherwise comparable; a good deal on boneless is still a good opportunity to make excellent barbecue.
Whichever one you bring home, give the seasoning time, manage a clean fire, protect the meat from harsh bottom heat, and plan the finish before dinner becomes a deadline. Those steps helped both shoulders turn out beautifully. Don't be afraid to fire it up.


