A Thanksgiving turkey has a lot riding on it. It is the centerpiece of the table, the meal everyone remembers, and sometimes the tradition you are trying to carry forward.
That was the challenge for Jeff. His dad cooked the big family feasts and could put just about anything on a grill. After losing him around Thanksgiving several years ago, Jeff wanted to bring those holiday dinners back. There was just one problem: he had never barbecued a turkey.
My job was to make that first cook feel manageable, without cutting corners on the things that make turkey special. We used a Big Green Egg, a rotisserie, a buttermilk brine, an aromatic butter injection, and fresh herb smoke. The goal was not to bury the bird under barbecue flavor. It was to make juicy, tender turkey with crispy skin that still tasted like turkey.
What You'll Learn
- Brining, butter injection, and refrigerator drying address different parts of a juicy turkey with crispy skin.
- Fresh sage, rosemary, and thyme bundles add seasonal smoke without overpowering the poultry.
- Truss tightly and secure the turkey to the rotisserie forks so it stays balanced as it shrinks.
- Protect the turkey from direct heat early, then finish over coals while verifying safe internal temperatures.
Table of Contents
- The Plan: Build Flavor Without Overpowering the Turkey
- 1. Start With a Buttermilk Salt Brine
- 2. Inject Aromatic Butter Into the Meat
- 3. Make Fresh Herb Smoke Bombs
- 4. Mix a Thanksgiving Turkey Dry Rub
- 5. Truss the Turkey and Secure It to the Rotisserie
- 6. Set Up the Big Green Egg for Two Stages of Cooking
- 7. Start Spinning and Track the Internal Temperature
- 8. Finish Over the Coals for Crispier Skin
- The Result: A Holiday Turkey Worth Carrying Forward
The Plan: Build Flavor Without Overpowering the Turkey
Poultry does not need the same heavy smoke treatment you might give a big cut of beef. For this Thanksgiving turkey, each layer had a specific job:
- Buttermilk and salt brine: Start the preparation with moisture and tenderness in mind.
- Compound butter injection: Put aromatic flavor inside the meat rather than leaving delicate herbs exposed to burning.
- Refrigerator drying: Prepare the skin for a better finish.
- Holiday dry rub: Add pepper, garlic, herbs, warmth, and color to the outside.
- Fresh herb smoke: Keep the smoke seasonal and subtle.
- A two-stage fire setup: Protect the turkey early, then finish over direct heat for crispier skin.
A lot of the work happens before the turkey reaches the grill. That is good news for a first-time turkey cook: you can break the preparation into individual jobs instead of trying to solve everything over a hot fire.
1. Start With a Buttermilk Salt Brine
I think of this as the first line of defense against dry turkey.
For Jeff’s bird, we used 1 cup of Diamond Crystal kosher salt and enough buttermilk to completely cover the turkey. The salt brand matters here. A cup of one type of salt is not automatically interchangeable with a cup of another, so do not casually substitute table salt by volume.
We placed a food-safe bag inside a bucket, lowered the turkey into the bag, added the salt, and poured in buttermilk until the bird was submerged.
The important distinction is that the bag, not the utility bucket, is the food-contact surface. A handy bucket is not necessarily a food-safe brining container.
Once the turkey was covered, it went into the refrigerator. Make room before you start pouring. A whole turkey sitting in a bucket of buttermilk is not something you want to juggle while rearranging shelves.
Plan this as advance preparation, not a last-minute step. The brining and subsequent refrigerator-drying stages need to happen before cooking day.
2. Inject Aromatic Butter Into the Meat
A turkey covered in fresh aromatics can smell fantastic during preparation. The trouble is that those exposed ingredients are prone to burning. I prefer to move that flavor inside the bird with a compound butter injection, then season the exterior separately.
Melt, infuse, and strain
Warm the butter with the aromatics over low heat, stirring until melted and incorporated. The preparation shown calls for about five minutes over low heat.
Before filling the injector, strain out the larger solids. This is not a fussy extra step. Herb pieces that move easily around a saucepan can still plug the injector needle.
Prioritize the breast
The breast gets my attention first. Work the injector into the meat without pushing through the skin on the other side.
- Insert the needle into the breast and gently change its position to distribute the butter.
- Inject gradually, drawing the needle back as you work through the meat.
- Repeat on the opposite breast, distributing the injection from front to back.
- Add butter to the thighs and accessible lower portions of the breast.
- Move to another spot when butter begins escaping from the injection area.
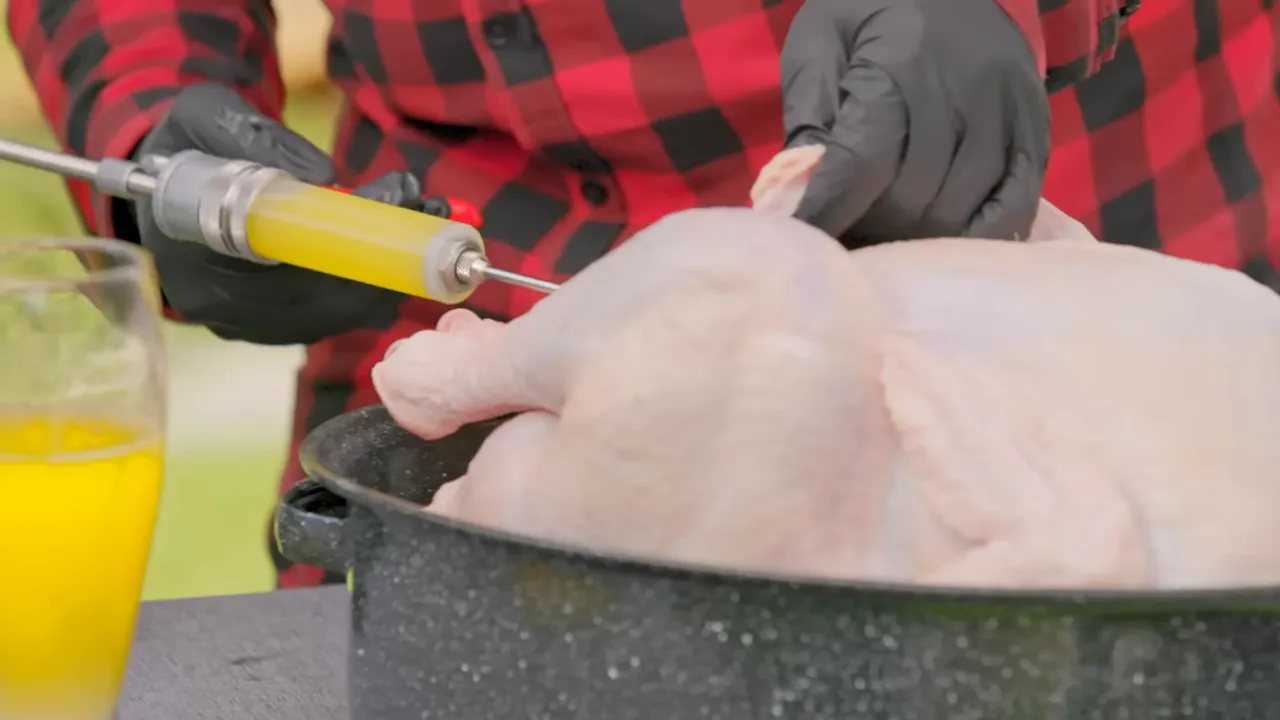
You can see and feel the meat filling as you inject. That does not mean you should keep pumping indefinitely. Once the butter starts running back out, that area has taken about as much as it can hold. More pressure is not better. Ask me how I know.
Prepare the skin for drying
After injecting, we added a light sprinkling of salt to the outside and returned the turkey to the refrigerator overnight. The purpose of that light application was to help the skin dry, not to give an already-brined bird another heavy layer of seasoning.
Juicy meat and crispy skin are separate jobs. The brine and injection address the inside. The drying stage helps prepare the outside.
3. Make Fresh Herb Smoke Bombs
For this cook, our smoke came from bundles of fresh Thanksgiving herbs:
- Sage
- Rosemary
- Thyme
Gather a little of each herb and tie them into small bundles with cooking twine. They do not need to win a beauty contest. They only need to stay together long enough to place in the fire.
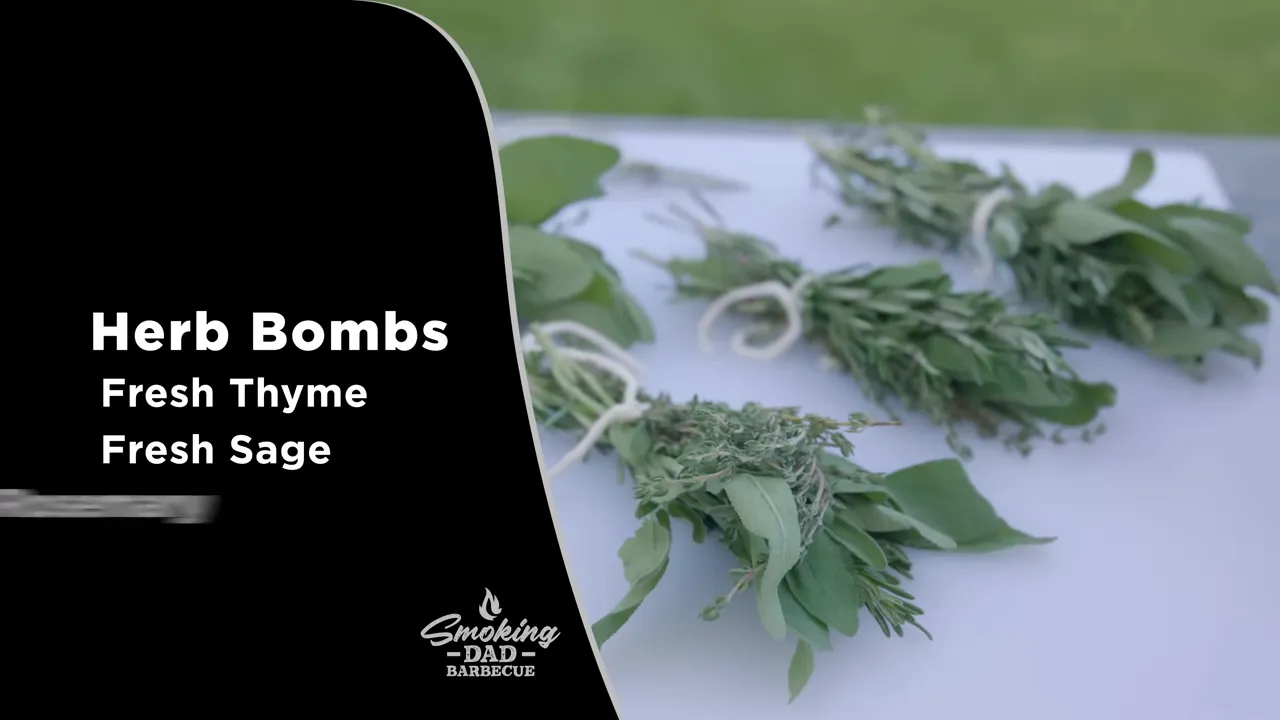
We prepared several bundles but planned to use them one at a time, adding a bundle directly to the active coals. Having extras ready is useful; using every bundle is not the objective.
This gives us smoke along with the fragrance of fresh herbs, without trying to turn a delicate bird into a heavily smoked roast. Match the intensity of the smoke to the food you are cooking.
4. Mix a Thanksgiving Turkey Dry Rub
The rub brings together pepper, garlic, herbs, a little warmth, and that beautiful roasted color.
Freshly cracked black pepper makes a real difference. You get the oils and aroma that are missing from pepper that has been sitting around already ground.
Our rub used:
- 2 tablespoons freshly cracked black pepper
- 2 tablespoons finishing salt
- 1 tablespoon garlic powder
- 1 tablespoon paprika
- Cayenne pepper for a little heat
- Dried thyme and dried sage for the holiday herb profile
- Nutmeg for a seasonal finishing note
Mix the ingredients thoroughly in a shaker. Jeff liked a little spice, so cayenne was a good fit. Keep that heat in proportion to the meal. We are building a Thanksgiving turkey, not trying to make the pepper the only thing anyone remembers.
Remember that mixing a batch of rub does not mean the entire batch has to go on the bird. The turkey has already been brined and lightly salted during preparation.
5. Truss the Turkey and Secure It to the Rotisserie
Trussing is not the glamorous part of the cook, but it matters. We want a compact turkey that rotates freely and stays secure as it cooks and shrinks.
Tie the wings and reinforce the legs
Run cooking twine underneath the wings and tighten it to keep the wing tips close to the body. Wrap again if needed to hold everything snugly.
Next, tie the legs together. Do not depend on a flap of skin to keep them in place. As the skin tightens during cooking, that little natural restraint can break.
The finished bird should be compact, without loose wings or legs flopping around as it turns.
Center the spit and tie to the forks
Season the outside, then pass the rotisserie spit through the turkey as close to its centerline as you can. Aim for a balanced load rather than a bird that hangs heavily to one side.
Seat the forks securely and tie the turkey to the forks themselves. That extra connection helps stop the bird from losing its position as the meat shrinks.
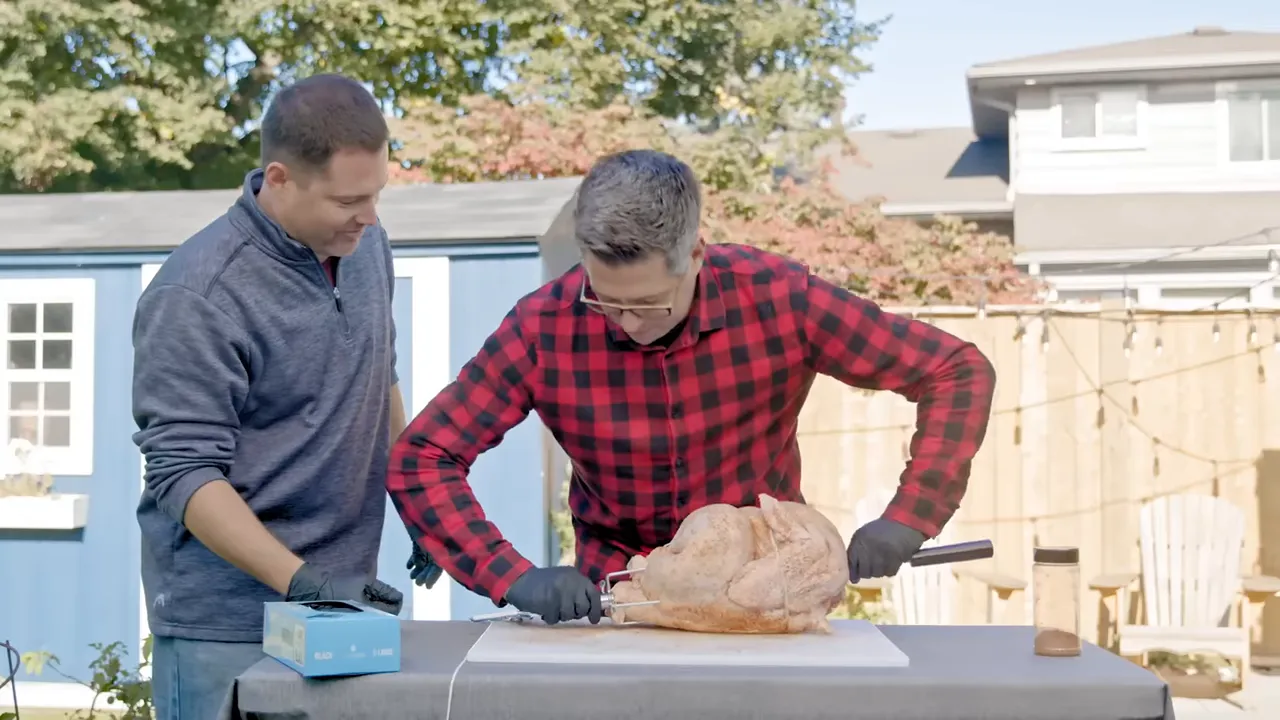
This can be much easier with a second pair of hands. After all that handling, touch up any areas where the seasoning has rubbed off.
6. Set Up the Big Green Egg for Two Stages of Cooking
The fire setup is what lets us cook gently at first and then focus on the skin at the end.
For Jeff’s Egg, we removed the original fire grate and installed an ash can and charcoal basket. We also removed the ceramic fire ring for this particular arrangement, leaving the fire bowl in place.
The basket and can make ash cleanup easier, but the key cooking lesson is the arrangement of the charcoal and heat shield.
- Use a manageable charcoal load. We started with roughly half a basket.
- Bank the charcoal toward the back. This leaves room to move it beneath the turkey later.
- Keep the charcoal low enough for the setup. The half-moon deflector and supporting grid need room to sit above it.
- Install the half-moon heat shield. It provides protection from direct heat during the first part of the cook.
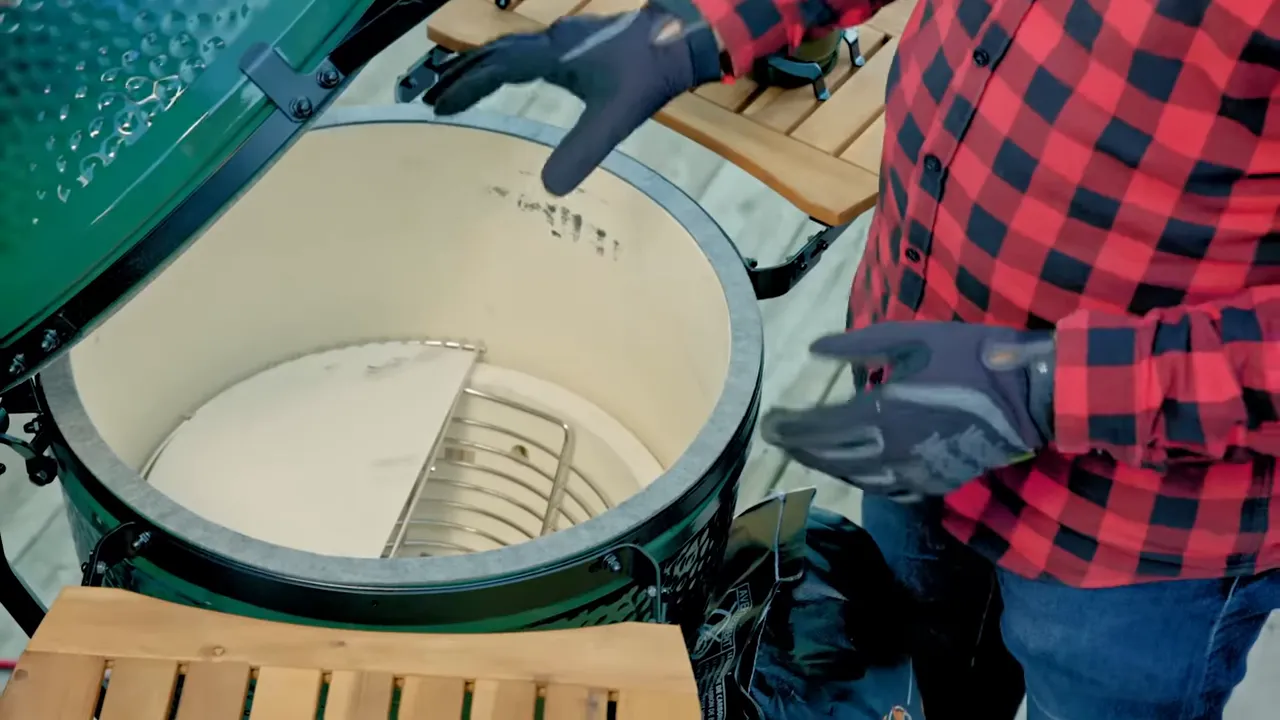
We lit the charcoal with the bottom vent and top regulator fully open during startup. Those are startup positions, not instructions to leave the vents wide open throughout the cook.
When the dome gauge was reading about 250°F, we installed the rotisserie ring, checked that the lid closed neatly against it, and mounted the motor. That reading was our installation checkpoint, not a fully specified cooking-temperature schedule.
7. Start Spinning and Track the Internal Temperature
Once the turkey is installed, check its rotation before closing the lid. It should be centered, clear of the grill’s interior, and free of binding or catching.
We placed a wireless thermometer probe in the breast and added the first herb bundle to the active coals. Then we used the thermometer app to follow the cook.
I set an alert at about 155°F. That was a prompt to start checking and preparing the finish, not a signal that the turkey was ready to serve.
Think of the wireless probe as the tool that gets you close. An instant-read thermometer finishes the job by checking multiple areas, including the dark meat that the breast probe cannot tell you about.
When Jeff’s alert arrived, I checked several locations with an instant-read thermometer before changing the fire setup. One reading does not describe an entire turkey.
A necessary temperature distinction
In this cook, I described being about five degrees below a roughly 160°F pull point before resting. Do not treat that as a guaranteed safe endpoint or assume that carryover cooking will always finish the job.
For a straightforward home food-safety standard, follow the USDA’s safe minimum internal temperature guidance: verify 165°F in the thickest breast and the innermost thigh and wing areas. The 155°F alert is only a workflow checkpoint.
8. Finish Over the Coals for Crispier Skin
Once the turkey was close to the finishing stage, we switched from protected cooking to direct heat.
With the dome open and high-heat gloves on, we removed the half-moon deflector and its supporting grid. Then we raked the coals directly beneath the turkey, adding a little more charcoal as needed to build the finishing fire.
The rotisserie continued turning while we concentrated on the skin. This is an active finishing stage, not the time to walk away.
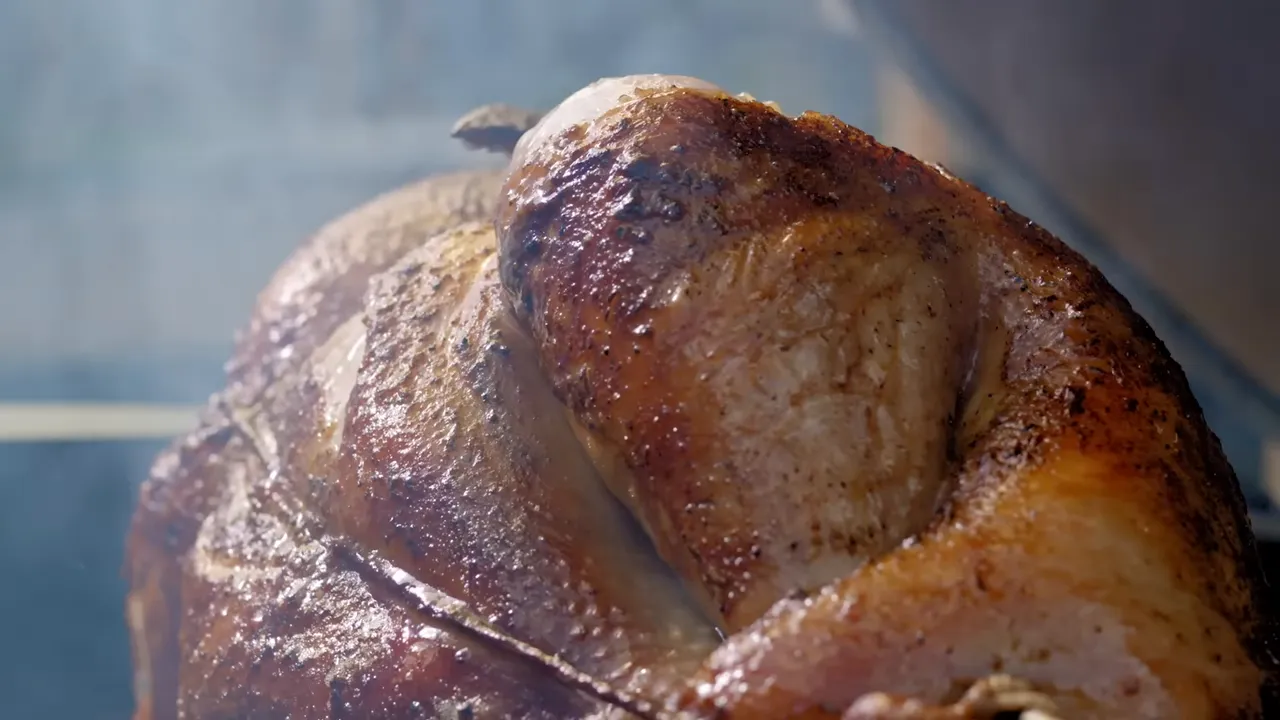
The important idea is protect first, crisp last. We did not ask exposed direct heat to do the entire cook. We used it when we wanted that final improvement in the skin.
Confirm the internal temperature in several locations before serving, and give the turkey a rest before carving. Skin color alone cannot tell you whether the meat is safely cooked.
The Result: A Holiday Turkey Worth Carrying Forward
When we carved Jeff’s turkey, the breast was tender and juicy, and the skin had the crispness we had worked toward. But the biggest success was the balance.
It did not taste only of butter. It did not taste only of smoke or dry rub. Those layers came together without taking away the character of the turkey itself.
That was the lesson Jeff took from the cook: stronger flavor is not always better flavor. With poultry, a delicate approach can give you a much more complete result.
For him, this was also the beginning of bringing those Thanksgiving dinners back to the family table. Not replacing his dad, and not trying to fill every part of those shoes. Just carrying a tradition forward in his own backyard.
There was a time when I thought I did not like turkey. A bird like this changes that pretty quickly. Give each preparation step a purpose, keep the smoke in balance, use your thermometers, and do not be afraid to fire it up.


