I spent years chasing thin blue smoke. If the smoke coming out of my kamado was barely visible, I figured I was doing something right. But what if that pursuit was leaving some of the best brisket flavor behind?
To find out, I cooked two closely matched briskets on two extra-large Big Green Eggs. Same seasoning, same wood, same charcoal, and cooking temperatures kept as close together as possible. One brisket got the familiar thin blue smoke. The other started with a much more visible white smoke before moving into a fully indirect finish.
The result? Both were juicy and tender, but one tasted unmistakably like barbecue brisket. The other leaned much closer to a roast beef dinner.
White smoke won our taste test, but that does not mean a smoldering, bitter fire is suddenly good barbecue. The important lesson is that not all white smoke is created equal.
Key Takeaways
- Controlled white smoke produced the preferred traditional brisket flavor in this Big Green Egg comparison.
- Hot coals and small wood additions matter more than exhaust color alone.
- Double-indirect shielding protects the brisket’s underside, while drip pans keep grease out of the firebox.
- An overnight 150°F hot hold made the briskets easier to finish and serve on schedule.
Table of Contents
- Why I Started Questioning Thin Blue Smoke
- How I Set Up the Brisket Comparison
- Build the Setup Around Heat Protection and Fire Access
- How I Built the Two Smoke Profiles
- The Overnight Hot Hold Made Serving Much Easier
- The Results: Similar Tenderness, Very Different Flavor
- How to Get More Smoke Flavor Without Getting Bitter Brisket
Why I Started Questioning Thin Blue Smoke
During a trip through Texas, I had the opportunity to eat at some outstanding barbecue restaurants and talk with people including Aaron Franklin, John Bates at InterStellar BBQ, and Cooper at Bar-A-BBQ.
Those conversations reinforced something I have learned over more than 20 years of smoking: advice needs context. What works in a thousand-gallon offset does not necessarily produce the same result in a backyard Big Green Egg.
That applies to cooking temperature, fire management, and smoke. Thin blue smoke from a large offset can deliver plenty of flavor. Chasing that same barely visible exhaust on a smaller charcoal cooker may leave me wanting more.
I have also been getting excellent results with a hybrid approach: start low and slow with a more pronounced smoke profile, then raise the temperature to finish hotter and faster.
Some pitmasters describe that early stage as cold smoking, but at roughly 200°F to 225°F, we are really talking about low-temperature barbecue. Actual cold smoking, such as smoking cheese, happens at much lower temperatures, generally below about 90°F. For this brisket cook, “low-temperature smoke stage” is the more useful description.
The theory sounded promising. A head-to-head cook would tell me whether it actually made a difference on the plate.
How I Set Up the Brisket Comparison
I wanted to compare smoke profiles, not accidentally repeat a hot-and-fast versus low-and-slow experiment. Even the same cooker can turn out very different brisket at different temperatures.
Here is what I kept consistent:
- The meat: Two Costco briskets selected and trimmed to be as similar as I could reasonably make two separate cuts.
- The seasoning: Our family’s Ultimate Texas SPG rub, developed from favorite elements of Black, Goldee’s, and Franklin-style rubs.
- The fuel: The same charcoal and wood for both cooks.
- The cookers: Two extra-large Big Green Eggs.
- The temperature: A starting target of about 220°F for the first few hours, followed by a temperature increase while keeping both cookers closely matched.
- The cooking position: Both briskets placed high in the dome on raised racks.
- The finish: Both pulled at 195°F in the flat, followed by the same overnight hot hold.
My earlier computational fluid dynamics work has made me a big fan of cooking higher in the dome. For this comparison, I used that position on both Eggs rather than making rack height another major variable.
This was still a backyard comparison, not a laboratory study. Two briskets are never identical, and the fire-access arrangements differed. But it was a useful test of two practical smoke-management approaches on the same style of cooker.
Build the Setup Around Heat Protection and Fire Access
For a long kamado brisket cook, I want two things: protection from excessive bottom heat and a practical way to manage the fire. Those needs determine the rack and deflector arrangement.
The Full Double-Indirect Setup
My full indirect arrangement used a convEGGtor, approximately half-inch spacers, and a pizza stone above it. That air gap is the key to the double-indirect setup.
- Install the convEGGtor in its supporting rack.
- Add suitable spacers approximately 1/2 inch tall. If using steel nuts or bolts, do not use galvanized hardware.
- Place the pizza stone on the spacers.
- Add a drip pan if the available clearance allows it.
- Install the cooking grid, preferably raised where the brisket will fit.
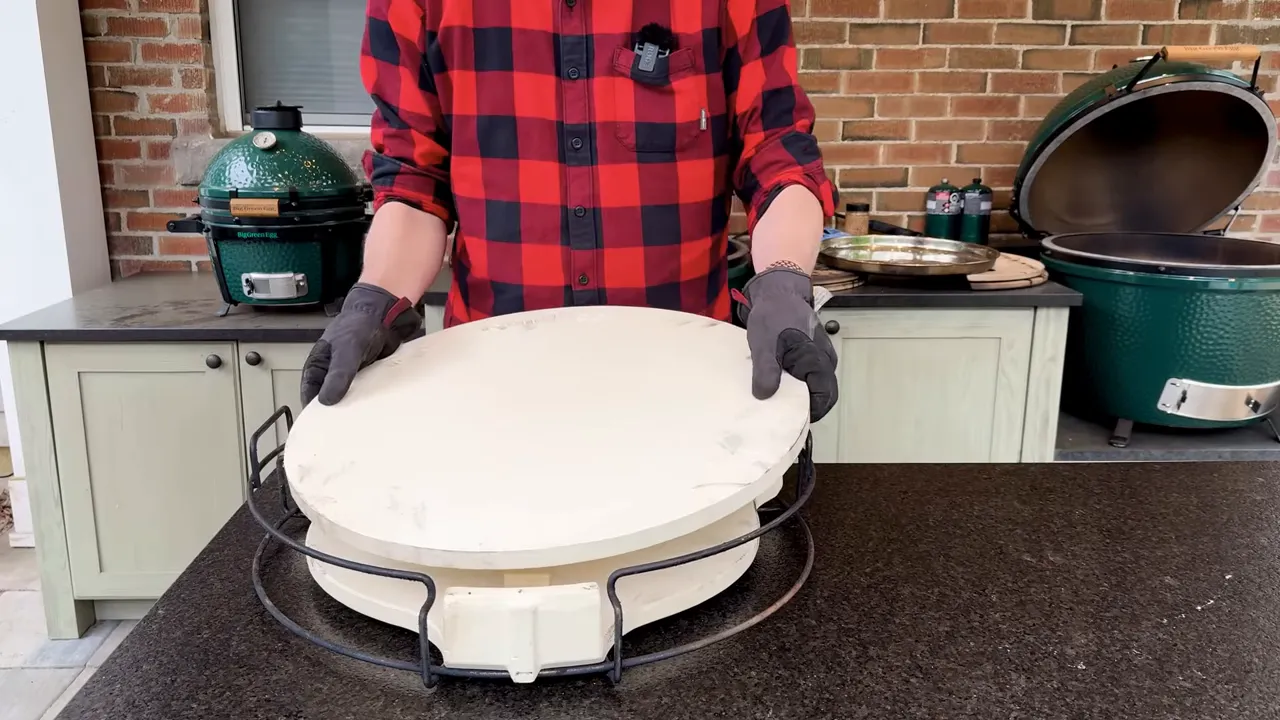
In my infrared checks, this arrangement reduced the exposed surface temperature by well over 100°F compared with the configuration I was checking against. That is a surface-temperature observation, not a claim that the cooking chamber runs 100°F cooler.
The practical benefit is protecting the bottom of the brisket from drying out and becoming leathery. I use the same thinking for pork shoulder and ribs. The extra shielding also makes the fire work harder to maintain the cooking temperature.
For this cook, I used a foil-lined Kick Ash can as a drip pan. Its small feet create clearance beneath it, helping keep collected drippings from burning against a hot surface.
There is a fit limitation here. On the extra-large Egg, the raised grid gives me room above that pan. A standard grid can contact the pan instead of seating properly. If your arrangement does not have enough clearance, leave the pan out and cover the pizza stone with foil to catch drippings while retaining the double-indirect protection.
The Half-Moon Setup for Adding Wood
The white-smoke approach needs access to the coal bed so I can add small wood splits during the early stage.
On the extra-large Egg, I used a Ceramic Grill Store Spider beneath the EGGspander rack to support a lower half-moon deflector. That provided about three inches of clearance below the rack. A second half-moon deflector above it added protection, while the open side allowed access to the fire.
I positioned the shielding toward the back so flames could not climb behind the brisket and scorch it. Later, I could add the remaining deflectors and a drip pan to turn the arrangement into a full indirect setup.
Check charcoal clearance before committing to a lowered deflector. A Spider places the ceramic below the main rack, where it can interfere with the charcoal load. That compromise is especially important on smaller cookers.
Adapting This to a Large Egg or Kamado Joe
The upper rack on the large Egg is roughly 14 inches across, compared with the approximately 18-inch raised grid I was using on the extra-large. A full packer brisket may not fit up there.
If you have a large Egg, a Kamado Joe, or another half-moon system without convenient sliding access, I would prioritize fire access during the early smoke stage:
- Remove the upper rack if necessary.
- Cook over a half-moon deflector and half grid, leaving the other side accessible.
- Use one deflector during the low-temperature stage if that is what fits. Double shielding is less important at this point.
- When the smoke stage is finished, install the remaining deflector and grid, then continue fully indirect.
Higher in the dome is my preference, but a setup you can safely and easily manage is more useful than a theoretically ideal rack position that blocks the fire.
How I Built the Two Smoke Profiles
Thin Blue Smoke: Full Indirect From the Start
For the blue-smoke Egg, I used the full double-indirect arrangement and let the ceramics heat soak before making final temperature adjustments.
Adding cold deflectors causes the indicated temperature to fall, so I did not immediately chase that drop with large vent changes. The cooker needed time to settle with all the cooking hardware installed.
During warm-up, my initial vent openings were roughly two fingers at the top regulator and two fingers at the bottom draft door. Those were starting positions, not fixed settings for the entire cook. I adjusted as the cooker stabilized.
The goal was the familiar light, wispy exhaust rather than a clearly visible white plume.
White Smoke: Small Splits on a Hot Coal Bed
For the white-smoke Egg, I started with a small charcoal bed and got it thoroughly hot before adding wood.
This distinction matters: I wanted visible smoke from burning wood, not bitter smoke from wood sitting there refusing to ignite.
I used naturally seasoned splits rather than kiln-dried wood and warmed the next pieces near the coal bed. Preheating them shortened the wait for ignition when it was their turn to go onto the coals.
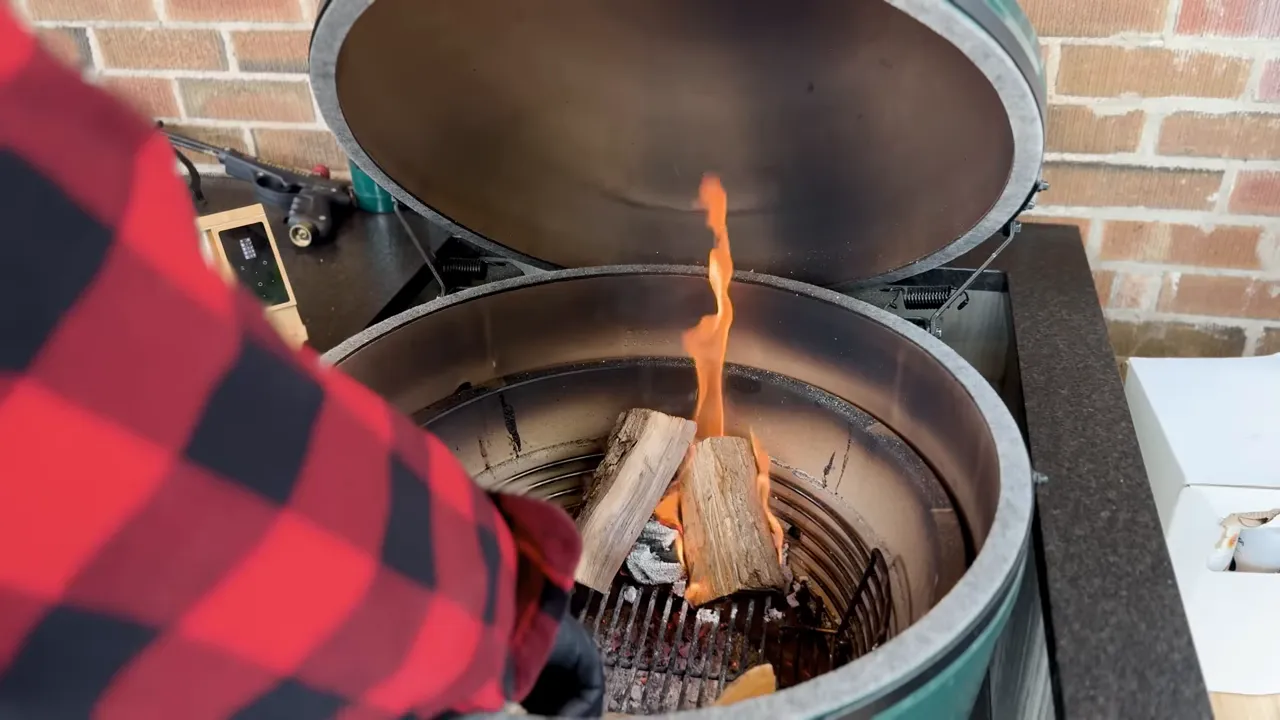
I added only one or two splits at a time, with the next pieces warming nearby. Replacement wood was needed about every 30 to 40 minutes, depending on how the fire was progressing.
Once the brisket was in place, I left the top regulator fully open and narrowed the bottom draft door to roughly a pinky’s width. Again, those settings describe this particular extra-large Egg setup. They are not a universal prescription for every kamado.
After a couple of hours, I added charcoal and used the torch to get the new fuel burning rather than leaving the brisket exposed to an unpleasant startup phase. Then I installed the remaining deflectors and drip pan and continued fully indirect.
Both briskets followed the same overall temperature plan. The deliberate difference was the early smoke profile, not one brisket cooking low and slow while the other raced through a hot-and-fast cook.
The Overnight Hot Hold Made Serving Much Easier
Both briskets reached 195°F in the flat within about a minute of each other, checked with an instant-read thermometer. I let them rest for about 30 minutes, wrapped them for the hold, and transferred them to an oven set at 150°F overnight until the following afternoon.
The hot hold is one of the most useful practices I brought home from visiting Texas barbecue restaurants. It solves a scheduling problem: brisket can be ready before the guests arrive, rather than making everyone wait for the brisket.
It also makes the finish more forgiving.
When cooking straight through to serving tenderness, I have had briskets finish anywhere from roughly 197°F to 211°F. Temperature alone does not identify that perfect moment. Pull too early and the meat can still be tough. Go too far and it can become dry and crumbly.
Learning that balance takes practice. For my extended-hold method, I aim to move the brisket into the hold around 190°F to 195°F instead of trying to hit the final serving texture entirely on the smoker.
Think of it like golf. Pulling at the exact perfect moment is a delicate shot onto an island green. Using the long hot hold gives me a much bigger landing area.
That earlier pull temperature belongs to the extended-hold method. It is not a promise that every brisket will be ready to slice at 195°F straight off the grill.
For an overnight hold, verify your equipment’s actual temperature rather than trusting the oven dial alone, and follow USDA guidance on safe hot holding. This is a controlled heated hold, not an overnight countertop rest.
The Results: Similar Tenderness, Very Different Flavor
Before slicing, the white-smoked brisket had a slightly darker bark. The blue-smoked brisket was a little more mahogany in color. The difference was noticeable side by side, but neither looked dramatically different from a well-cooked brisket.
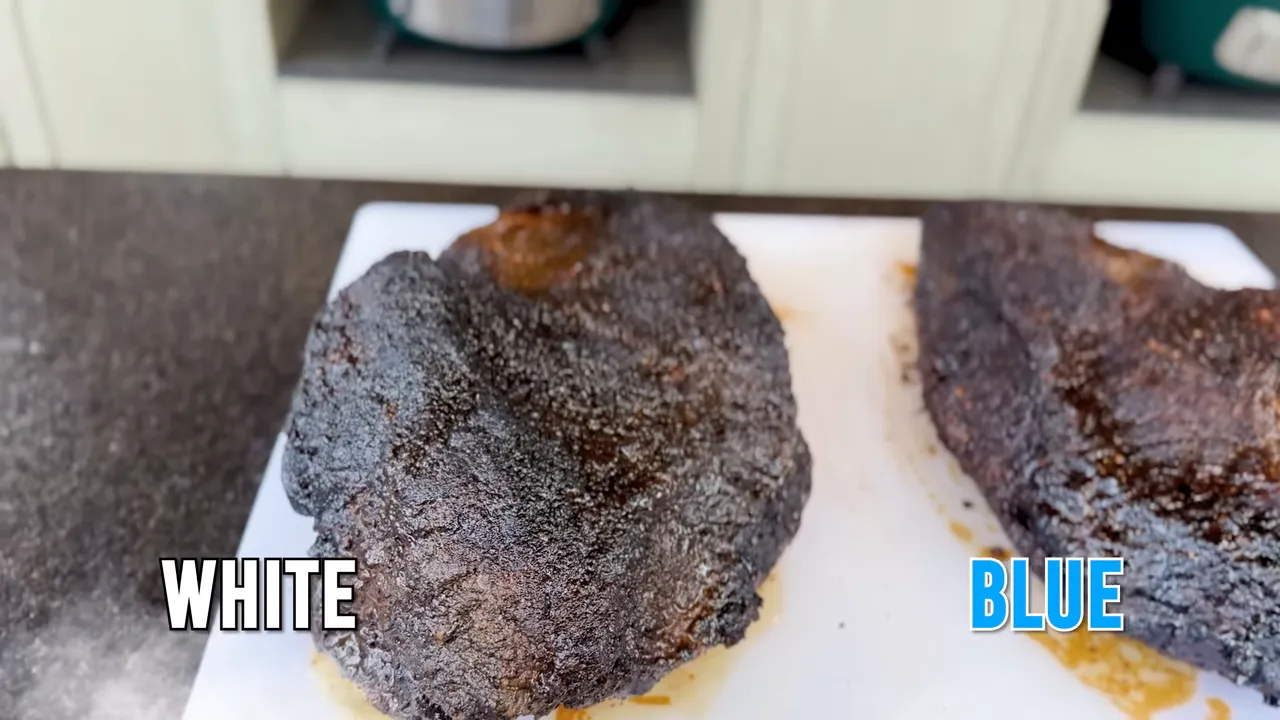
I sliced samples from both the flat and the point. Both briskets showed the things I want to see:
- Soft, rendered fat on top rather than a firm, waxy cap.
- Rendered seam fat in the fatty sections.
- Plenty of moisture in the cut meat.
- Slices that flopped without immediately falling apart.
- Meat that separated with a gentle pull.
No squeezing required. I would rather leave those juices in the brisket than push them onto the cutting board.
For the taste test, I kept the samples separate and brought Sarah out without telling her which smoke method produced which brisket. She tried both the lean and fatty sections before choosing a favorite.
We agreed that tenderness and juiciness were very similar. The flavor was not.
White Smoke Delivered the Barbecue Flavor We Preferred
Sarah picked the white-smoked brisket for a traditional barbecue brisket dinner. The smoke was more flavorful and made the meat taste more distinctly like smoked brisket.
That was especially interesting because Sarah is not always looking for a strong smoke flavor. Sometimes she prefers less. Here, though, she felt the extra smoke enhanced the beef rather than overpowering it.
Most importantly, neither of us found it bitter. This was a pleasant smoke flavor, not the harsh result people usually mean when they warn about “dirty smoke.”
Blue Smoke Was Delicious, but Much Milder
The thin-blue-smoke brisket was still tender, juicy, and enjoyable. It just tasted more like roast beef than the barbecue brisket we were expecting.
If Grandma were coming over for a roast beef dinner, that would be an easy choice. It also made sense for chopped brisket sandwiches for friends who do not particularly enjoy smoke.
For the friends and neighbors who love smoked brisket, the white-smoked one was the brisket I wanted to serve.
The result changed my preference for this kamado method. It did not prove that white smoke always beats blue smoke on every cooker. A large offset, a pellet grill, a kettle, and a ceramic kamado do not necessarily deliver the same flavor simply because their exhaust looks similar.
How to Get More Smoke Flavor Without Getting Bitter Brisket
The wrong conclusion would be to close the vents, pile in wood, and celebrate the biggest cloud possible. That is not what made this cook work.
1. Get the Wood Burning, Not Just Smoking
A cool, oxygen-starved fire can produce unpleasant deposits and bitter flavor. That wet-tree taste is not the goal.
I want wood that ignites readily on a hot coal bed. In a closed kamado, the flame is harder to monitor than in an offset, which makes sensible wood placement and small additions especially important.
Depending on the method, I place wood beneath the charcoal or burn a small number of splits directly on an established coal bed. The point is controlled combustion, not smoke color alone.
2. Do Not Overload the Cooker With Wood
More wood is not automatically more good flavor. For these approaches, I used a modest load of four pieces beneath the charcoal or one or two splits at a time on the active coal bed.
Those are different loading strategies, not instructions to combine every piece into one enormous wood load. Give the fire a manageable amount to burn.
3. Keep Grease Out of the Firebox
White smoke can come from grease as well as wood, and those are not interchangeable flavor sources.
Both drip pans collected a substantial amount of rendered fat during this cook. Without a catch surface, that fat would have ended up in the firebox.
You might not notice much at brisket temperatures. Then, during the next steak sear or pizza cook, the accumulated grease burns off and the grill starts looking like a locomotive coming through town.
A drip pan, foil over the appropriate catch surface, or a foil-lined pan helps prevent that buildup. Keeping the pan separated from intense heat also helps keep the drippings from burning during the cook itself.
4. Treat Smoke Like Seasoning
Smoke is a little like perfume. A small amount can be pleasant. Too much can take over the room.
Salt is another useful comparison. The right amount is the amount that makes the food taste better to you and the people you are feeding.
My next brisket will not be an exercise in making the exhaust disappear at all costs. It will start with a hot, manageable fire, a controlled dose of wood, good protection from bottom heat, and enough smoke to deliver the flavor my family enjoys.
Do not be afraid of a little visible smoke. Be concerned about why the smoke is there. That is the distinction that took this brisket from a good beef dinner to the barbecue flavor we wanted.
If you want help working through your own kamado setup, my monthly members-only live sessions give us time to tackle barbecue questions in real time.
|


